📅 April 1, 2024
 We have our physical volumes created, but what do we do with them?
Can we format them? Can we store data on them?
No, not yet. A physical volume merely specifies a drive or partition that is to be used with LVM. The next step is to assign physical volumes to volume groups, and this is were the fun and flexibility of LVM becomes apparent.
The Volume Group
Physical volumes by themselves are not associated with anything. We must assign physical volumes to volume groups. Think of a volume group as a group of physical volumes — a storage pool — from which we can divvy up into logical drives as needed. This is very flexible because we can create many groups if we need them, and each group is separate from the others. We can make the pool larger or smaller by adding or removing physical volumes.
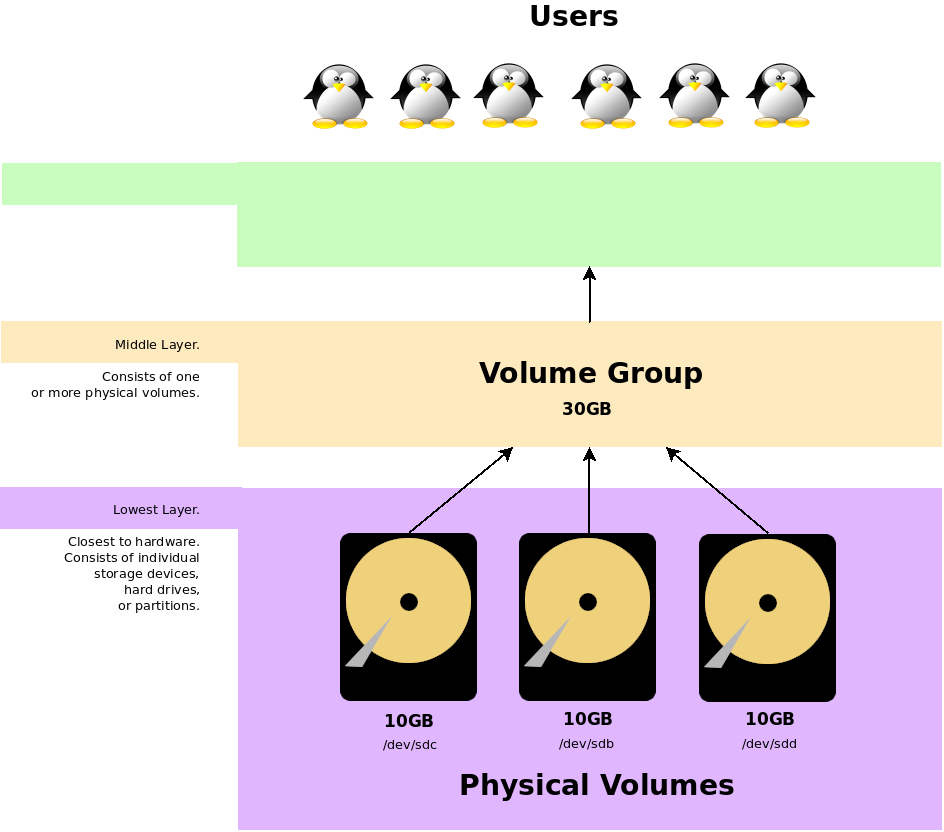
Three physical volumes are assigned to a single volume group. This is the simplest arrangement. Users cannot read and write data yet because a mounted logical volume does not exist. The volume group is the middle layer of abstraction that sits between the hardware and the logical volume the users see.

We are not limited to a single volume group. Multiple volume groups are allowed if there are enough physical volumes to go around. Here, we see two volume groups. One is 20GB created from two 10GB physical volumes, and the other is a 10GB volume group created from a single 10GB physical volume. Drives need not be the same size. We are using 10GB in this example for simpler math.
In the future, we can expand the capacity of either volume group by adding another physical volume and then assigning it to a volume group. Physical volumes cannot be shared between volume groups. A physical volume must belong to one volume group only. Not shared. However, different partitions on a single physical device can be assigned to different volume groups as different physical volumes, thus, “sharing” one physical drive between volume groups via partitions.

/dev/sdb is a 10GB drive containing two 5GB partitions. We can create physical volumes out of partitions and then assign those physical volumes (the partitions created) to different volume groups. In this case, even though we have a single, physical hard drive, the two partitions on it are assigned to two different volume groups to create two 15GB volume groups.
Personally, I avoid this kind of partitioning assignment because what if /dev/sdb fails? We would lose data in both volume groups. However, LVM lets you perform this kind of assignment in case you need it.
Volume Group Commands
Just like the pv commands handling physical volumes (pvcreate, pvremove, and more) all begin with pv, volume group commands all begin with vg. There are more of them than there are pv commands because the volume group layer is where you will spend most of your time customizing storage options.
vgcfgbackup   - Backup volume group metadata to /etc/lvm/backup directory
vgcfgrestore  - Restore volume group configuration
vgchange      - Change the volume group attributes
vgck          - Check volume group metadata for consistency
vgcreate      - Create a volume group (the most important)
vgconvert     - Converts LVM1 to LVM2. Support removed. No longer used, so avoid it.
vgdisplay     - Show volume group information
vgexport      - Export. Puts volume group into an unusable, offline state until vgimport
vgextend      - Add a physical volume to an existing volume group. Adds more storage.
vgimport      - Registers an exported volume group with the system. Used for migration.
vgimportclone - Imports a volume group from cloned physical volumes
vgmerge       - Combine two volume groups into one
vgmknodes     - Create /dev files for volume groups that might be missing
vgreduce      - Remove a physical volume from a volume group. The opposite of vgextend
vgremove      - Remove a volume group
vgrename      - Rename a volume group. Yes, volume groups must have names
vgs           - A brief overview of detected volume groups
vgscan        - Check if any volume groups exist on the system
vgsplit       - Move a physical volume from one volume group to another.
Just like with pv commands, all volume group commands require sudo privilege. We will only cover the most essential commands in this article.
Create a Volume Group
![]()
Let’s create a very simple volume group from our three physical volumes.
sudo vgcreate vgdata /dev/sdb /dev/sdc /dev/sdd
Output
Volume group "vgdata" successfully created

We must specify a name for the volume group when we create it.
In this example, we created a volume group named vgdata using the vgcreate command. We can make up almost any name that we want, but keep it reasonable. Avoid spaces, special characters, and excessive length. Remember, you will need to type this and identify it should you ever want to modify the volume group. I included the “vg” prefix to help identify this name as a volume group.
List the device files for the physical volumes. Order does not matter. If you have partitions on a drive, use the partition device files, such as /dev/sdb1 or /dev/sdb2.
Check if a Volume Group Exists
![]()
sudo vgscan
vgscan does not provide any details. It only lets you know if any volume groups exist.
View Brief Volume Group Details
![]()
Above, we found that the volume group we created exists, and its name is vgdata. What if we need more information about it?
sudo vgs

vgs is a brief overview of all detected volume groups. Only one exists here.
sudo vgs vgdata

Specifying a volume name returns brief info about that volume group only. Useful if multiple volume groups exist.
View Detailed Volume Group Details
![]()
Just like the pvdisplay command, we can use the vgdisplay command to view further details about a volume group.
sudo vgdisplay

vgdisplay shows details about all detected volume groups on the system. Notice the Cur PV and Act PV rows? These indicate how many physical volumes constitute the volume group. Three are currently installed, and all three are active.
Which Physical Volumes in the Volume Group?
![]()
“How can I view which exact physical volumes are in the volume group?”
Remember the pvdisplay command? Run it again, and look at the VG Name row that is now populated. All physical volumes of the same VG Name will show which drives are assigned to the volume group in the PV Name row.
sudo vgdisplay
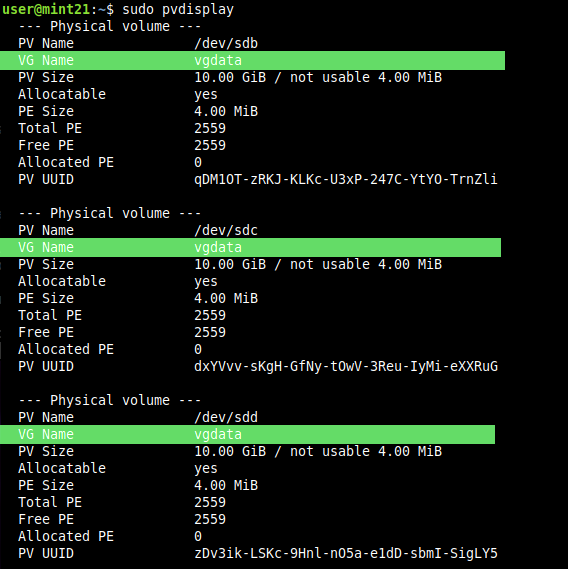
Look at the PV Name row for each VG Name row of the same volume group name. These are the physical volumes assigned to the volume group.
sudo pvs

pvs is more concise.
If multiple volume groups exist, this is more selective:
sudo pvs | egrep vgdata

vgdata is the name of the volume group we are inquiring about.
Or if you want to be fancy:
sudo pvdisplay -S vgname=vgdata -C -o pv_name

pvdisplay usually shows details, so the given options narrow down just the row information we want to see for less clutter.
Oops! How to Remove a Volume Group
![]()
Suppose we made a mistake or we need to eliminate a volume group. The vgremove command removes a given volume group.
sudo vgremove vgdata
The volume group no longer exists.
Keep in mind that the physical volumes still exist. We would also need to run pvremove on each to unmark them for use by LVM.
Creating Two Volume Groups
From our three 10GB physical volumes that we still have, let’s create two separate volume groups named popcorn and fluffybear.
sudo vgcreate popcorn /dev/sdc
sudo vgcreate fluffybear /dev/sdb /dev/sdd
In this case, which drives we assign does not matter since we are going to change things. Now, let’s look at what we have created:
sudo pvs

Both volume groups appear.
sudo vgs popcorn
sudo vgs fluffybear

Specifying a volume name shows only that volume group.

With our three 10GB physical volumes, here is what our diagram now looks like with two volume groups.
Removing a Physical Volume
![]()
We want to remove the physical volume from the popcorn volume group. First, find out the device file of the physical volume you want to remove. In this case, it is /dev/sdc obtained from vgs above. Then, use vgreduce, *NOT* vgremove, to remove the physical volume from the volume group.
sudo vgreduce popcorn /dev/sdc
Hmm. That did not work.
The vgreduce command reduces the size of a volume group by removing a physical volume, but we cannot remove the last physical volume from a volume group. If there is only one volume left in the group, then the command fails. Let’s try removing a volume from the fluffybear group.
sudo vgreduce fluffybear /dev/sdb
That works.
This is why volume groups have names. Multiple groups can exist, and we need to be specific about which one to modify by using its name.
Now, try to remove the last volume from the fluffybear group.
sudo vgreduce fluffybear /dev/sdd
This fails too because we cannot remove the last physical volume from a volume group.
Merging Volume Groups
![]()
As it stands now, we have two volume groups, popcorn and fluffybear, that each contain one physical volume. We want to combine these two volume groups into one.
sudo vgmerge fluffybear popcorn

With vgmerge, the volume group listed first (fluffybear) is the group we are merging INTO. The volume group listed last (popcorn) will disappear.

vgmerge merges two volume groups together into one.
The volume popcorn merges its data and physical volumes into fluffybear (listed first) and preserves all data. Right now, we have no data, so this is going to work. However, vgmerge can involve some thought and considerations due to many factors, so be careful when merging if containing data is involved. LVM allows advanced data migration techniques like this with minimal effort.
The popcorn volume group is removed automatically. Only the fluffybear volume group remains, and it contains the physical volume from popcorn.
sudo vgs
sudo pvs | egrep fluffybear
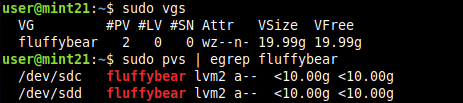
Two volume groups have been merged into one. Notice that popcorn is missing. This is normal because it has been merged into fluffybear, and the popcorn name no longer exists.
Renaming a Volume Group
![]()
Right now, we have a volume group named fluffybear, but we want to rename it to vgdata like we had before. We use the vgrename command to rename a volume group.
sudo vgrename fluffybear vgdata

Data remains intact. All we did was change the volume group name from fluffybear to vgdata. fluffybear no longer exists as a usable name as shown by pvs.
Adding a Physical Volume to a Volume Group
![]()
What about the third, unused physical volume /dev/sdb? We want to add it to the vgdata volume group, and we can do this using the vgextend command.
sudo vgextend vgdata /dev/sdb

vgdata now consists of three physical volumes. Also notice that vgs shows 3 physical volumes under the PV column to reflect that three physical volumes exist.

Our progress so far.
Conclusion
We are getting closer to a working LVM system, but users cannot use it yet. We still need to create a logical volume that can be formatted and mounted, and that will be covered in part 3.
Volume groups are the main part of LVM, so definitely peruse the man pages for the vg commands. There are many, many options that we cannot possibly cover here, but it shows how flexible LVM can be for almost any storage scenario that you might need.
Have fun!
