📅 April 3, 2024
 We have created physical volume building blocks. We assigned them to volume group storage pools. Now, it is time for the final piece of the LVM system: logical volumes.
The logical volume is the “thing” that we format, mount, and allow users to interact with. We can treat a logical volume just like any other NVMe, SSD, or HDD.
Logical Volume Commands
Logical volumes have their own set of commands. Just as physical volume commands begin with pv and volume group commands begin with vg, logical volume commands begin with…you guessed it…lv.
lvcreate    - Create a logical volume
lvchange    - Change logical volume attributes
lvconvert   - Change logical volume layout
lvdisplay   - Show detailed information about logical volumes
lvextend    - Increase the size of a logical volume
lvreduce    - Decrease the size of a logical volume
lvremove    - Remove a logical drive
lvrename    - Rename a logical volume
lvresize    - Resize a logical volume
lvs         - Show brief information about logical volumes
lvscan      - Check if logical volumes exist
Creating a Logical Volume
![]()
sudo lvcreate -l 100%FREE -n lvdata vgdata
This creates a logical volume named lvdata using 100% of the free space from the vgdata volume group. Doing so creates a simple LVM system that looks like this:

With a logical volume now created, we can move to the format and mounting step.
About the Creation Options
There is a plethora of options we can apply when creating a logical volume. Far too many to cover, so please consult the man page for details. In the command above, the most important option was the -l (lowercase “L”) that controls the size of the resulting logical volume by specifying how many extents to allocate to the logical volume from the volume group.
-l 100%FREE
This means use all space from the volume group. You see, we can actually create multiple logical volumes from the same volume group. How much space is determined by the size. We must always specify a size when creating a logical volume.
In this case, we are specifying ALL of the available space from the 30GB volume group in order to create a simple logical volume of that size: 30GB.
-n lvdata
This sets the name of the resulting logical volume to lvdata. We need to assign a name for future identification. We can use almost whatever name we like. I prefer to prepend it with lv in order to make it clear later that this is a logical volume. Some use lv- or lv_ or -lv or _lv. Use a naming convention that makes sense to you.
vgdata
This specifies which volume group to use as the source of available storage. Multiple volume groups may exist, so we must be specific by using the correct volume group name.
Identifying a Logical Volume
![]()
“Can users read and write data yet?”
No, not yet. The logical volume lvdata is just like an unformatted hard drive. We need to format it before use, so how do we identify its device file?
sudo fdisk -l

fdisk shows the device file path /dev/mapper/vgdata-lvdata for the logical volume we just created.
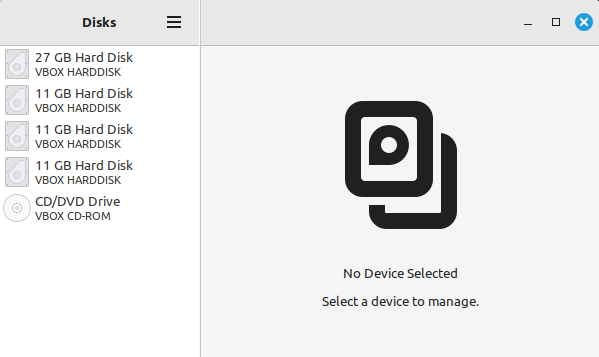
A logical volume is treated like any other drive, so any disk management software will identify it. If you scroll through the results of fdisk -l, you will eventually file the logical volume. We can also use Disks.

Disks in Linux Mint 21.3 shows the logical volume’s device file as /dev/vgdata/lvdata.
“Which device file do I use: /dev/mapper/vgdata-lvdata or /dev/vgdata/lvdata?”
Either will work equally well, so take your pick.
Formatting a Logical Volume
![]()
Both of these will work, so choose either device file. No need to format twice. These two commands are shown for options. Use one or the other, not both.
sudo mkfs.ext4 /dev/vgdata/lvdata
sudo mkfs.ext4 /dev/mapper/vgdata-lvdata
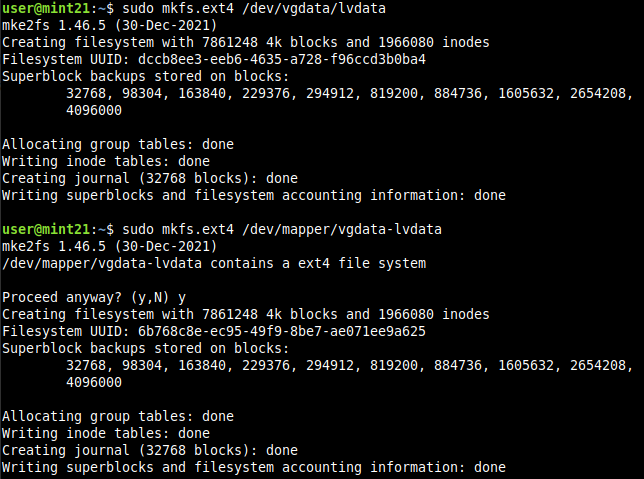
Both device files format as ext4 in this example. We now have a formatted logical volume.

We can even use Disks to format the logical volume complete with LUKS full-disk encryption.
We can treat a logical volume just like any other hard drive or storage device.
Mounting the Logical Volume
![]()
Even though the logical volume has been formatted as ext4, we must mount it to a mount point before we can use it. Let’s create a dedicated mount point. For consistency, I created a mount point with the same name as the logical volume. This is not a requirement. Pick what you like.
sudo mkdir /media/lvdata
Then, we mount it.
sudo mount /dev/vgdata/lvdata /media/lvdata
Now, we can finally use the logical volume! …at least root can. Permission will be limited to root privileges the same as any other new device mounted like this, so create a directory in lvdata root and set its permissions to 777 for this demonstration. You can alter permissions to whatever you like later.
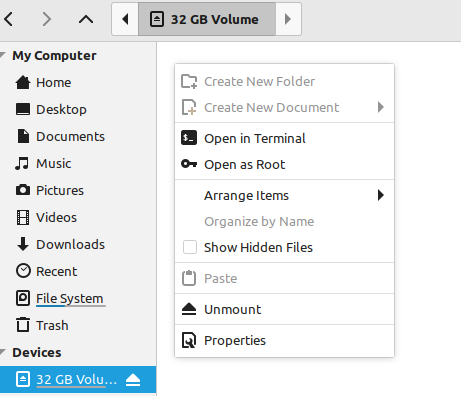
The formatted logical volume has been mounted to /media/lvdata, but the creation actions are grayed out in Nemo. This is because root mounted it, so only root has write permission. This is normal Linux behavior for any storage device.
sudo chmod 777 /media/lvdata
This allows anyone to write to /media/lvdata. Not the best practice, but it is fine for this example.

Now, the creation options are permitted.

We can now create folders and files on the mounted logical volume. A better practice would be to allow permission for users and groups on specific directories instead of granting permission to everyone like we just did. However, this example is nothing critical, so it does not matter here.
Removing the Reserved Blocks
![]()
Many journaling file systems, such as ext4, reserve 5% of the total storage space as reserved blocks after formatting. Let’s see how much free space we have available in the logical volume lvdata.

What’s this? 1.6GB used? How? lvdata only contains two empty folders and one empty file. Where is this used space coming from?
This is normal for Linux. 5% has been reserved in the form of reserved blocks. We can manually set the reserved blocks to anything we like, so let’s set it to 0 to remove it completely since it is unnecessary for a data drive.
sudo tune2fs -m 0 /dev/vgdata/lvdata

tune2fs modifies a file system. The -m 0 option sets reserved blocks to 0, thus, removing them completely. Perform this operation on the device file, not the mount point.

Now, we see the used space is 16.8MB. This is normal since the file system itself usually uses a small amount of space for its own management, such as the file system directory or journaling information.
Adding a Volume Label
![]()
Nemo reports the mounted volume name as “32 GB Volume” because the volume lacks a label, which we did not set. Let’s add one. I chose “lvdata” the same as the name of the logical volume for consistency. Pick whatever you like.
sudo tune2fs -L lvdata /dev/mapper/vgdata-lvdata
(Either device file will work.)

Reopening Nemo shows lvdata where 32 GB Volume used to be.
So far, we have performed the same, regular operations that we perform on any other storage device to show that once we have a logical volume created, formatted, and mounted, then we can treat it just like any other storage device on the system. In the eyes of Linux, a logical drive is a normal storage device. LVM works its magic behind the scenes, completely invisible to the end user.
Creating Multiple Logical Volumes
In our simple example, we created a single logical volume that uses all available space from the volume group. But we can create multiple logical volumes of custom sizes from the same volume group. This is where the power of LVM begins to show.
However, we cannot create another logical volume because all of the free space in the volume group is used up.
sudo lvcreate -l +100%FREE -n bubbles vgdata
sudo lvcreate -L 10G -n lvbubbles vgdata

Both attempts fail to create a new logical volume named lvbubbles because there no free space left in the volume group.
The -L 10G options is another way to create a logical volume of a specific size. The upper case -L denotes an exact size expressed in units. In this case, 10GB. Of course, all space from the volume group has been allocated to lvdata, so there is nothing left for a new logical volume.
Deleting a Logical Volume
![]()
We need to remove the logical volume. CAUTION! Doing so loses all data, so make sure you have backups if you are performing this on production systems. Use any one of these commands. They are shown to illustrate options.
sudo lvremove /dev/vgdata/lvdata
sudo lvremove vgdata/lvdata
sudo lvremove /dev/mapper/vgdata-lvdata
To remove a logical volume we must identify it using the volume_group/logical_volume notation or use its device file. Any of the three above commands will work, but they all fail. Can you guess why?

A logical volume cannot be removed while it is still mounted and in use.
We need to unmount the logical volume before we can remove it.
sudo umount /media/lvdata
Now, try to remove the logical volume lvdata using any of the previous lvremove commands.
sudo lvremove vgdata/lvdata
A confirmation prompt confirms if you really want to remove the logical volume.
WARNING: Removing a logical volume will lose the data stored on it!
The logical volume is completely gone in Disks. Any data it might have contained cannot be recovered without forensics.
The space allocated to the logical volume has been freed up and returned to the vgdata volume group. True, we could use forensics tools, such as photorec, to recover the data, but we cannot simply recreate the logical volume and restore the data as it was before. There is no undo, so exercise caution when removing logical volumes.
With 30GB of available space in the volume group, we can create multiple logical volumes.
sudo lvcreate -L 8G -n lvbubbles vgdata
sudo lvcreate -L 500M -n lvtinytim vgdata
sudo lvcreate -L 13G -n lvjumboshrimp vgdata
sudo lvcreate -l 100%FREE -n lvpebbles vgdata
This creates four logical volumes:
-
lvbubbles 8G
-
lvtinytim 500M
-
lvjumboshrimp 13G
-
lvpebbles Use all remaining space
lvpebbles uses the -l 100%FREE option to allocated whatever space is left over when we do not know the exact amount. Our diagram now looks like this:
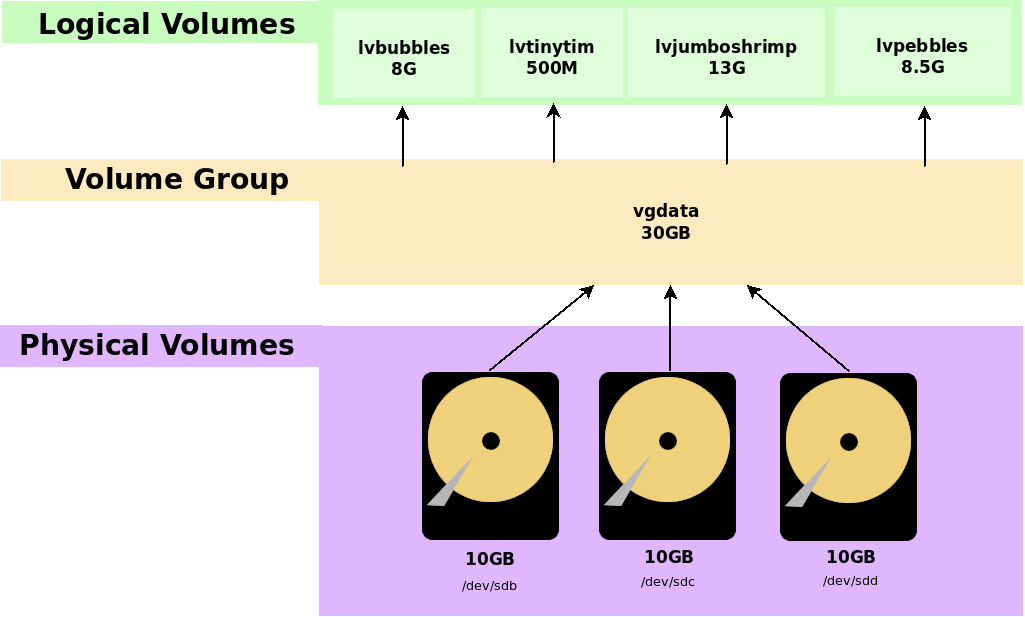
Four logical volumes created from the same volume group.
Each logical volume will need to be formatted and mounted separately in order for users to access them.

Our completed LVM system. Assuming permissions are properly assigned, users can read and write files via the mount points.
The Idea Behind LVM
“How do you know which hard drive is associated with which logical drive?”
You don’t. This is one aspect of LVM that requires a change in thinking. With a regular drive, we easily see the 1:1 mapping between the drive and a mount point.
But not so with LVM. Due to the abstraction that exists between logical volumes and physical volumes, we are not in control of which hard drive holds the data for which logical volume. LVM handles this automatically.
The idea behind LVM is so we do not need to be concerned with this. Think of the volume group as a swimming pool filled with water. We need one liter from the pool, so we dip into it, take one liter (there is now one less liter of water in the pool), and once finished, we pour it back into the pool. There is no separation among the different sections of water (this water came from this place, that water come from that pond, and so on). It is all water treated as one.
This is similar to how RAM works. If we need more RAM in a system, we add another memory stick or two or three. This new memory is added to the pool of available RAM for the OS to use. We do not keep track of which memory stick holds which process (a running program). If a program needs RAM, then the OS allocates some from any of the memory sticks to the process and frees it up once finished.
Same thing with LVM. If we need more storage space in the available pool, just add another hard drive to the volume group. We can then expand whichever logical volume we choose from the additional space in the storage pool while preserving existing data and eliminating and backup/restore/format procedure.
Of course, there is much more that LVM is capable of, but we cannot cover everything here. This is a only a basic example to illustrate the idea behind LVM.
Linear Logical Volumes
By default, the logical volume we created is referred to as a linear volume that behaves similar to JBOD (Just a Bunch Of Drives). Once the first drive (physical volume) is filled up, data is then stored on the next drive and the next, and so on.
However, I would not rely upon this thinking completely in order to figure out which drive holds the data from which logical volume due to the many ways physical volumes with or without partitions can be assigned to various volume groups that then create logical volumes in a myriad of ways. It can become confusing.
Just know that the LVM default is linear because other types of logical volumes are possible, such as RAID, but this is another topic.
Does a Logical Volume Exist?
![]()
Let’s continue with the four logical volumes created in the example above to see what the computer sees. The lvscan command is a good first step to answer the question, “Do any logical volumes exist?” All logical volume commands require sudo privilege.
sudo lvscan

Four logical drives exist. In case you were wondering, “How do you know that lvpebbles is 8.5GB when you used +100%FREE” from the diagram above, then this is how. The size of each logical volume is given.
Brief Logical Volume Details
![]()
lvscan is fine, but what if you need a little more information? lvs will provide a little more information.
sudo lvs

lvs shown additional information. Some columns are empty for features not mentioned here.
Even More Information
![]()
lvdisplay will provide plenty of details about all detected logical volumes by default.
sudo lvdisplay

Use lvdisplay for additional logical volume details.
To get information about a specific logical volume, use its name with lvdisplay. Any of these techniques will work.
sudo lvdisplay vgdata/lvbubbles
sudo lvdisplay /dev/vgdata/lvbubbles
sudo lvdisplay /dev/mapper/vgdata-lvbubbles
We need to specify the volume group/logical volume addressing to identify the logical volume.

All three commands return the same result.
Personally, I find the sudo lvdisplay vgdata/lvbubbles syntax to be the most convenient.
Renaming a Logical Volume
![]()
Suppose lvjumboshrimp is too much to type and we want to change its name. The lvrename command renames a logical volume.
sudo lvrename vgdata/lvjumboshrimp lvstar
Again, be sure to specify the volume group from which the logical volume was created.
lvjumboshrimp is renamed to lvstar.
Confirm
sudo lvscan
sudo lvs

lvstar is the new name.
Any data is kept intact. Renaming does not cause data loss.
Unmounting Is Not Always Necessary
We have been performing commands on unmounted logical volumes. Usually, you must unmount a logical volume before you can perform certain operations on it, but some operations, such as renaming, can be performed without unmounting. This way, users can use the file system on the logical volume while you administer the system.
Let’s test this. Mount lvstar. (Remember to format the logical volume before mounting it.)
sudo mkdir /media/lvstar                       # Create mount point
sudo mkfs.ext4 /dev/vgdata/lvstar              # Format as ext4
sudo tune2fs -m 0 -L lvstar /dev/vgdata/lvstar # Clear reserved blocks
sudo mount /dev/vgdata/lvstar /media/lvstar    # Mount

Disks shows lvstar mounted. Ignore the 2.4% full. Nemo properties shows usage at 16.4KB. Reserved blocks were set to 0.
Try to rename lvstar to lvstarlight.
sudo lvrename vgdata/lvstar lvstarlight
sudo lvs

It works! We can rename a logical volume while it is still mounted.
Extending a Logical Volume
![]()
Suppose lvstarlight is running low on free space. Maybe we need to plan for the future by increasing its size by 13GB. How do we do this?
This is where LVM shines, and it is the main point in this entire demonstration. Let’s add a 13GB virtual drive to our VirtualBox VM. In this case, this means shutting down VirtualBox, creating a 13GB virtual hard drive, and connecting it to the VM.
...processing...
Okay, done. The Linux Mint 21.3 VirtualBox VM has been reloaded with a 13GB blank virtual drive. This was deliberately given a different size to make it distinguishable from the others.
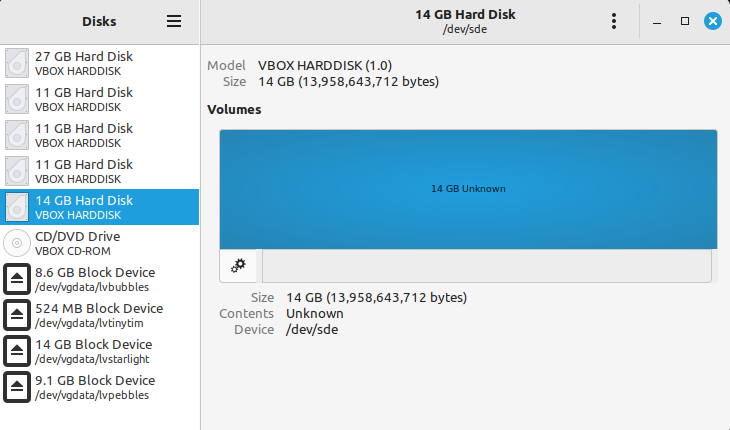
Disks shows our new, unformatted drive as 14G at /dev/sde.
Mount lvstarlight.
sudo mount /dev/vgdata/lvstarlight /media/lvstar
Put some files and directories on lvstar (the mount point), and look at its properties.

Total usable space on the lvstarlight logical volume (mounted at /media/lvstar) is 13.6GB.
We want to increase the size of lvstarlight with an additional 13GB. This volume is mounted, and others are using it. Can we expand tits size while mounted and in operation?
Before we begin, take note that not all file systems can be expanded while mounted. ext3 and ext4 are fine, but others, such as btrfs and ZFS, require the file system unmounted first. Since this file system is ext4, we can leave it mounted and pretend that users are accessing it as we administer it.
Extension Steps
Step 1. Convert the New Drive to a Physical Volume
Our new drive is identified as /dev/sde.
sudo pvcreate /dev/sde
Create a physical volume from /dev/sde.
Step 2. Add the new physical volume to the volume group
This is referred to as extending the volume group, and we use the vgextend command. Use the physical volume’s device file (/dev/sde) when adding it to the volume group. The volume group is our existing vgdata.
sudo vgextend vgdata /dev/sde
/dev/sde is now a part of vgdata.
Check
Let’s see how this new addition has changed vgdata.
sudo vgdisplay
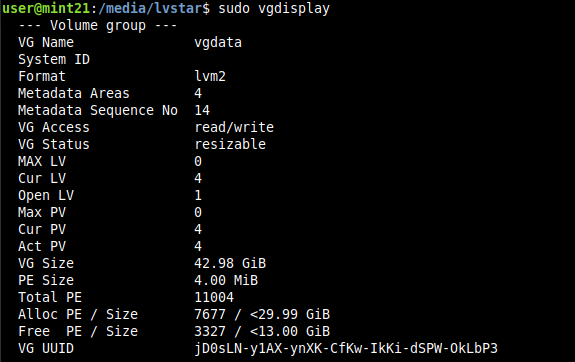
Take note of Open LV and Free PE. This tells use how many unassigned physical volumes there are and the amount of free, unassigned space (PE = physical extents). This means that vgdata has grown in size, and that extra space is not used yet.
Step 3. Extending a logical volume
Adding a physical volume to the volume group does not automatically grow each logical volume. We need to specify how to assign the free space to the logical volumes of our choosing. In this case, we will assign all of the new free space to lvstarlight using lvextend.
sudo lvextend -l +100%FREE vgdata/lvstarlight
Operation successful, but is it really?
Step 4. Verify
Check the new size of lvstarlight using lvs and lvscan.
sudo lvs
sudo lvscan

It works! lvstarlight was 13GB, but after extending, it is now 26GB.

However, Nemo Properties still reports the mounted volume as the old 13.6GB.
Hmm. We need the users to see the change, so let’s try remounting the volume.

Disks shows the new size, but…
Nemo still reports the old capacity even after a remount.
Let’s try rebooting the VM and remounting lvstarlight.
No change. Despite a reboot, Nemo Properties still reports the old capacity.
This should not happen. Actually, it did work, but this seems to be an issue with Nemo not refreshing its information. df, lvs, lvscan, lvdisplay, fdisk, and Disks all report that correct information without rebooting, but not Nemo.
Not sure why, but we can see that we did indeed successfully expand lvstarlight to 26GB simply by adding another physical volume to the volume group and expanding lvstarlight. And best of all, these changes were made while the logical volume was mounted. There was no need to unmount, reboot the system, or inconvenience the users. This entire operation is completely invisible to the end user.
Reducing a Logical Volume
![]()
Suppose we allotted too much space to lvstarlight and we want to reduce it to 5GB. Keep in mind that this is less than any of the 10GB physical volumes composing the volume group. What happens?
We use the lvreduce command to decrease the size of a logical volume.
BEWARE! Reducing a logical volume can cause data loss, but it depends. If you have 20GB of data and you reduce it to 4GB, then you will lose data. But if you have 3GB of data and reduce 20GB to 15GB, then maybe not. There are no guarantees, so always back up your data first.
sudo lvreduce -L 5G vgdata/lvstarlight

You will see a warning and a confirmation prompt when you reduce a logical volume’s size because this is a potentially destructive operation.
Verify
sudo lvscan
sudo lvs
sudo vgs

lvstarlight is now 5GB in size. The 21GB it had is sent back to the volume group storage pool as 21GB of free space as shown from vgs.
“Did we lose any data?”
lvstarlight was mounted during this operation. We did not need to unmount it during the reduction because ext4 allows resizing while in-place.
Opening /media/lvstar (its mount point) in Nemo shows our directory and file because they were small enough to begin with.

Our data remains intact because these files are so small. If we had data larger than 5GB on this logical volume, then we would have most likely lost some data. However, never rely upon this logic. Always back up your data before expanding or reducing a logical volume.
Resizing Multiple Logical Volumes
![]()
With 21GB of free space in the volume group, let’s expand each logical volume by 4GB to show that we can assign free space however we please.
We could use lvextend to do this, but let’s have a look at the lvresize command. lvresize will either expand or reduce a logical volume based upon the +/- size unit we provide.
sudo lvresize -L +4G vgdata/lvbubbles
sudo lvresize -L +4G vgdata/lvtinytim
sudo lvresize -L +4G vgdata/lvstarlight
sudo lvresize -L +4G vgdata/lvpebbles

All logical volumes resized by an additional 4GB using the lvresize command.
Verify
sudo lvscan

All logical volumes have been increased by 4GB.

Disks reflects similar results. The capacities will not be exact matches with lvscan due to rounding, but we can see that the resize changes were applied without unmounting volumes or rebooting the system.
lvresize also works to reduce the size of a logical volume.
sudo lvresize -L -1.5G vgdata/lvpebbles

Since lvresize with a negative size unit is the same as lvreduce an has the potential to lose data, we are presented with the same confirmation.
Suppose we do not want lvtinytim or lvpebbles anymore. We can remove them with lvremove as before. This completely removes both of these logical volumes and makes the space available as free space in the volume group.
sudo lvremove vgdata/lvtinytim
sudo lvremove vgdata/lvpebbles

A confirmation is given since this will destroy existing data on lvtinytim and lvpebbles. Data stored on lvbubbles and lvstarlight remains intact.

Disks immediately reflects the changes. Now, only two logical volumes exist.
sudo vgs

Our vgdata volume group now has 21.98GB of free space. We still have four physical volumes total (#PV), but only two logical volumes (#LV).
Expanding by Free Space Percentage
Let’s expand lvstarlight with 75% of the free space from the volume group, and expand lvbubbles with whatever is left over.
sudo lvextend -l 75%FREE vgdata/lvstarlight
sudo lvextend -l 100%FREE vgdata/lvbubbles

75% and then 100%? This sounds odd at first, but it makes sense.

We now have two logical volumes: lvbubbles with 14.5 GB and lvstarlight with 16.49GB.
First, we told LVM, “Extend lvstarlight using 75% of the free space in the volume group.” lvstarlight extended, and this reduced the available free space in the volume group by 75%.
Then, to use up the remaining free space in vgdata and assign all of it to lvbubbles, we needed to specify 100% of the free space in the volume group. This says, “Take all free space remaining in vgdata and give it to lvbubbles.” We do not use 25% as might be expected because then we would leave 75% of that left over as free space remaining in the volume group. To use all free space in the volume group, we need to specify 100%.
Rounding Storage
14.5GB and 16.49 are not exact numbers. Let’s set lvbubbles to an exact 10GB and expand lvstarlight by whatever free space this action creates. We use lvresize and lvextend to do this.
sudo lvresize -L 10G vgdata/lvbubbles
sudo lvscan
sudo vgs

lvbubbles is exactly 10GB with 16.5GB of free space in the volume group.
sudo lvextend -l +100%FREE vgdata/lvstarlight
sudo vgs

All free space now allocated to lvstarlight. Be sure to use +100%FREE and not 100%FREE alone. We need to use the “+” character here.
sudo lvscan

lvbubbles is 10GB and lvstarlight is 33GB.
Our LVM diagram now looks like this:
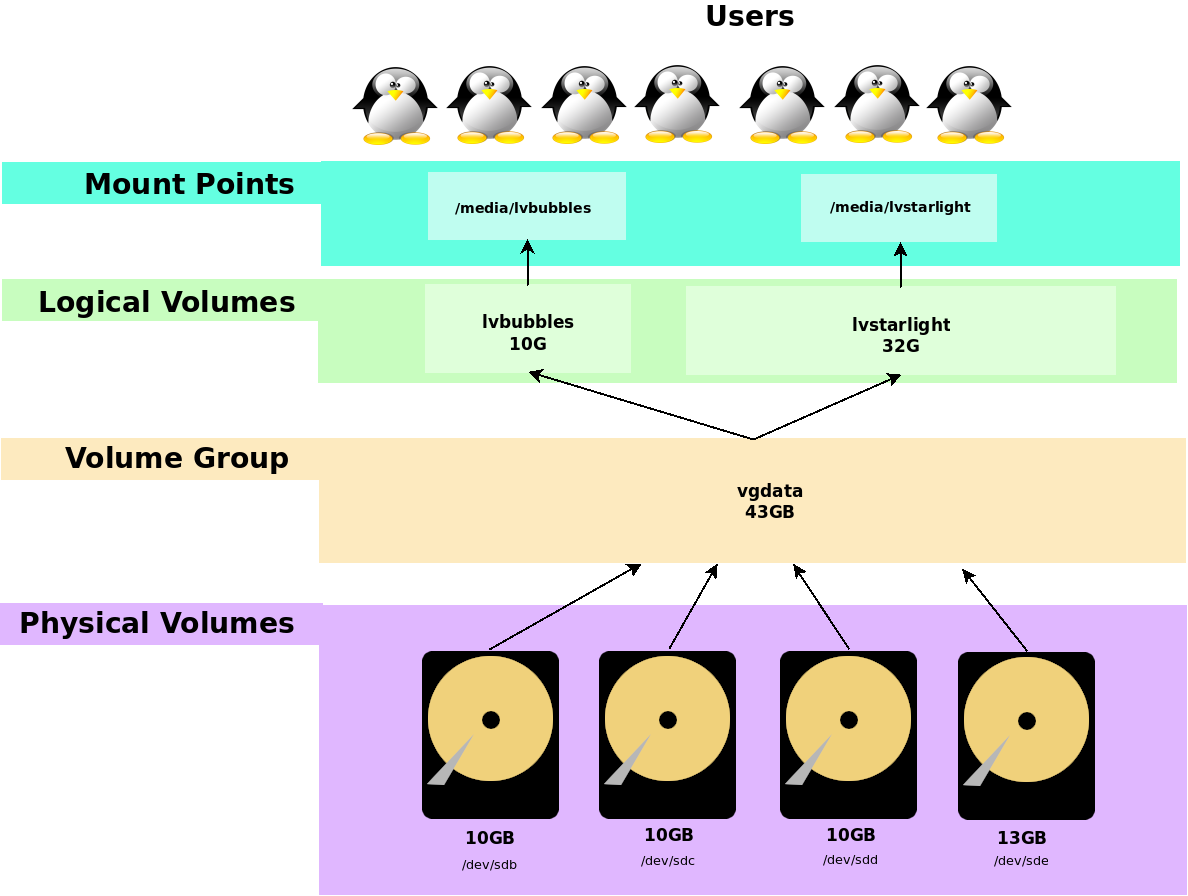
We have come a long way since our original example.
What is What?
“Which drive is connected to which logical volume?”
“If a drive fails, how do I know which one to replace?”
“Will I lose data if a drive fails? If so, which logical volume is lost or are both lost?”
“I lost track of which drive contains the data for a specific logical volume. Help!”
These questions are valid, but they are rooted in the previous way of thinking when one drive equaled one mount point. With that technique, it is easy to figure out which drive holds what data for replacement, but it is also less expandable. LVM is different, and requires a different way of thinking.
The volume group is a storage pool of hard drives. To help understand this, think of a volume group as all of the available space from all physical volumes “mixed together” just like water in a swimming pool or RAM in a group of DDR5 memory modules.
(Behind the scenes, there is some order and structure to how data is stored, but we are looking at this from an end-user perspective.)
From this pool of available storage space, we assign the capacity we need to logical drives. We no longer need to think in terms of “Which drive is going to hold the data for this logical volume?” Yes, this matters when a drive fails or needs to be replaced, but this is an advanced topic for another time. And yes, this conundrum can be a downside to LVM compared to a traditional partitioning system.
In-Place Modification
Notice that all of the changes we made — resizing, renaming, reducing, extending — could be performed in place with the ext4 file system as users were using the system. We did not need to unmount the file system or reboot the computer. (True, I rebooted the VM earlier for demonstration purposes.) This is vital for Linux servers that need near-100% uptime, and this alone makes LVM desirable assuming the hardware is hot-swappable.
Conclusion
With this, we have constructed a basic LVM system that allows for easy future expansion simply by adding more storage devices.
“What? You mean there is more?”
Oh, yes. This article barely covers what LVM is capable of. For example, LVM supports mirrored volumes, RAID, Copy-on-Write operations with file system snapshots, and more features that require future articles for explanation. What we created here is a simple LVM with linear logical volumes. That means to expand the size of a logical volume, just add more hard drives to the volume group and extend the logical volumes, which is what we did.
But there is much more we can do to make our storage system more robust to automatically handle failed hard drives or lost data.
LVM is not for every situation, but it is certainly worth looking into for awareness in case you encounter a place where it would best be used.
Have fun!
