📅 April 6, 2024
 RAID (Redundant Array of Independent Disks) is available in Linux using mdadm, but did you know that RAID is also possible with LVM?
By default, LVM creates a linear logical volume, but we can create a RAID logical volume as well with RAID modes 0, 1, 4, 5, 6, and 10 (also known as 1+0).
How is RAID accomplished with LVM?
Topics
- Creating RAID1
- Checking RAID with lvs and lsblk
- Creating a standard linear volume from extra space shared by RAID volumes
- Mounting and Testing
- Simulating Drive Failure
- Replacing a Failed Volume
- Adding a Third Drive to RAID1
- Converting RAID1 to RAID5
- Removing a Volume from RAID1
- Adding a Fourth Drive to RAID5 for More Storage Capacity
- Fixing Inconsistent Volume Group Metadata
- Activating/Deactivating a Logical Volume
- Converting RAID5 Back to RAID1
- Creating RAID5
- Creating RAID6
- Creating RAID10
- Scrubbing
- Soft Data Corruption
- RAID with DM Integrity
- Adding DM Integrity to an Existing RAID Array
- LVM RAID or mdadm?
Resetting the VM Drives
![]()
We will continue with the existing VM demonstration, but we will reduce it to a single hard drive. Before we do, let’s remove all logical volumes, volume groups, and physical volumes so can start fresh. First, make sure any logical volumes are unmounted.
WARNING! These actions will destroy all existing data!
sudo lvremove vgdata/lvbubbles    # Remove logical volume
sudo lvremove vgdata/lvstarlight  # Remove logical volume
sudo vgreduce vgdata --removemissing # Remove missing volumes from an old group
sudo vgremove vgdata              # Remove the volume group
sudo pvremove /dev/sd[b-e]        # Remove all physical volumes
For the last command, my VM hard drives were in the range /dev/sdb to /dev/sde, so that command worked. Your setup might use different device files, so adjust your command.

Removing all physical volumes restores them to regular storage devices. LVM no longer recognizes them.
Next, I shut down the VM and disconnected all but one hard drive, leaving the 10GB /dev/sdb. This is to answer a very good question, “Do we need to have physically separate hard drives to create LVM RAID?”
So, we will begin with a single physical drive and try to create a RAID1 logical volume from it. What will happen?
With the VM restarted with only one blank data drive (the OS drive is on a separate drive and not relevant to the data), let’s try to create a RAID1 logical drive.
RAID Exists in the Logical Volume Layer
![]()
First of all, RAID is made on logical volumes. Not physical volumes. Not volume groups.
Logical volumes.
This is important to know because it means the physical volume and volume group steps remain the same. When we create a logical volume using LVM, that is where we specify RAID.
Let’s set up a 10GB volume group from a single 10GB physical volume. My virtual hard drive is /dev/sdb in this example.
sudo pvcreate /dev/sdb          # Create physical volume
sudo vgcreate vgroup /dev/sdb   # Create volume group
So far, this is the same as before. We created a physical volume from /dev/sdb, and then created a volume group named vgroup using the physical volume /dev/sdb. To implement RAID, we do so in the logical volume step like this:
sudo lvcreate --type raid1 -l 100%FREE -n lvraid1 vgroup
We want to assign all free space in the volume group to the RAID1 logical volume named lvraid1, but…
RAID1 requires a minimum of two physical volumes.
The RAID1 logical volume is not created. We need to add another physical hard drive to the system. Shut down the VM and add another virtual drive.
...processing...
After shutting down and adding a 13GB hard drive (the one used in previous experiments) to the VM and then powering it back up, I now had two hard drives to work with. Let’s try the command again.
sudo lvcreate --type raid1 -l 100%FREE -n lvraid1 vgroup
Still cannot create a RAID volume even though we added another drive to the system.
What happened? We need to prepare the new hard drive by adding it to the volume group first. Linux will not automatically toss a free drive into the volume pool. We must do that manually. The new 13GB is /dev/sdc in this system.

This is all LVM sees, so we cannot create a RAID1 array yet. Our new hard drive is connected, but it must first be converted for LVM use. This is why the RAID creation failed. We need at least two drives for RAID, and only one is available.
sudo pvcreate /dev/sdc         # Create physical volume (PV)
sudo vgextend vgroup /dev/sdc  # Add PV to volume group
sudo pvs

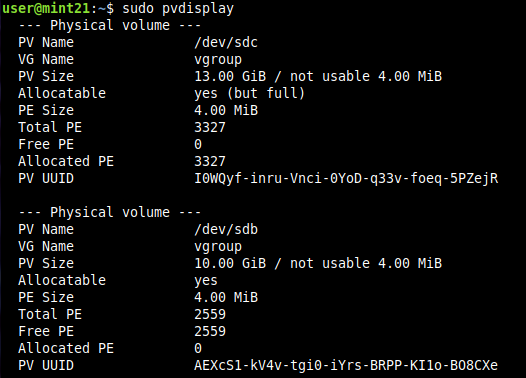
Now, we have two physical volumes available for RAID1. One is 10GB, and the other is 13GB. What will be the RAID capacity?

By the way, if you encounter message like this for missing LVM volumes, it is because the volume group was not properly removed. Use vgreduce –removemissing and vgremove, and then pvremove.
sudo lvcreate --type raid1 -l 100%FREE -n lvraid1 vgroup
Now, it works! We have a RAID1 logical volume created.
Is It Really RAID1?
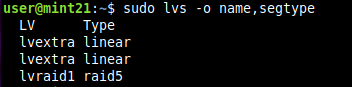
lvs supports many more columns than the default. To check for RAID, we must specify the segtype column in the output.
sudo lvs -o name,segtype

segtype displays the logical volume layout type.
If you prefer to view all columns plus segtype,
sudo lvs -o+segtype

Default columns plus anything extra, such as segtype.
Two Drives or Vague Volume Group Assignment?
![]()
We need at least two drives for RAID1 even with LVM because the two drives will be mirrors of each other…but did we really set up RAID on two separate hard drives? The vgroup volume group has a total of 23GB of free space, so how do we know the space is not shared from the same drive?
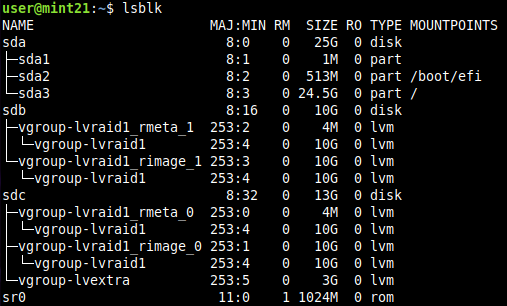
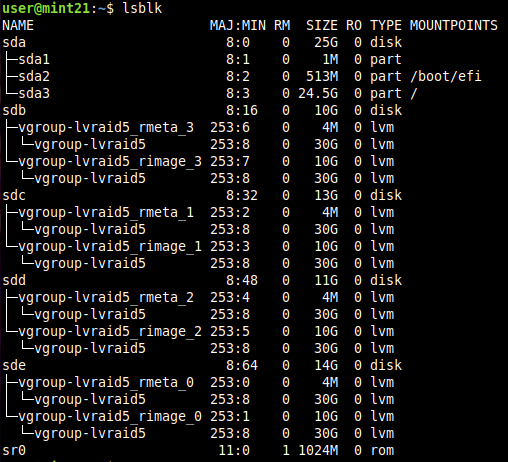
Use lsblk to find out.
sudo lsblk
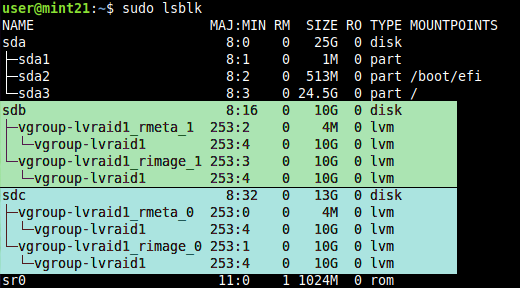
/dev/sdb and /dev/sdc are the two physical volumes for our RAID1 logical volume.
Ignore /dev/sda and /dev/sr0 since they are not relevant. We see that the RAID1 logical drive indeed uses two separate physical volumes, /dev/sdb and /dev/sdc, because each drive contains its own rmeta and rimage subvolumes.
RAID is Only as Large as Its Smallest Member Disk
Did you notice something in the SIZE column in the image above? Our RAID1 logical volume, named lvraid1, is only 10GB in size even though one of its member disks is 13GB. This is normal, and this is how RAID works. We can see that /dev/sdc is 13GB, but its RAID components (rmeta and rimage) are 10GB in size.
Why? RAID is only as large as its smallest member disk. Since the smallest capacity in this two-drive RAID array is 10GB, only 10GB is used from the 13GB drive.
What are rmeta and rimage?
If you have used mdadm before, then this might seem strange. LVM creates a subvolume for metadata and a subvolume for the actual data. Each disk will have its own rmeta and rimage subvolumes. These will be numbered for different disks.
- /dev/sdb
- rmeta_1
- rimage_1
- /dev/sdc
- rmeta_0
- rimage_0
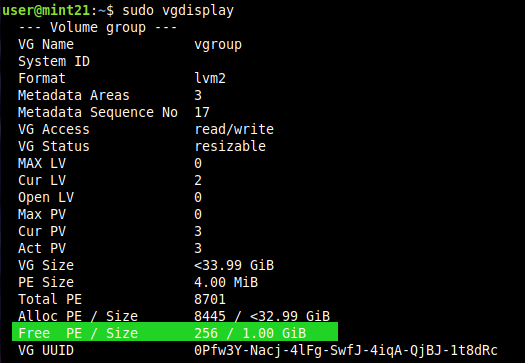
What About the Extra 3GB?
Ah, you spotted that too?
sudo vgdisplay

The extra 3GB of free space in the volume group is leftover from /dev/sdc and is available to use.
To avoid waste, we can create a 3GB logical volume from this extra space.
sudo lvcreate -l 100%FREE -n lvextra vgroup
sudo lvscan
sudo lsblk

Using lsblk, we see that the 3GB logical volume, named lvextra, was created using space located on /dev/sdc.
This 3GB logical volume is not RAID1 nor does it have any redundancy even though the drive it shares is a RAID1 member disk. lvextra is a regular linear logical volume. If /dev/sdc is missing or failed, then lvextra will not be accessible.
LVM needs separate physical volumes to form RAID. When one drive fails, that drive can be replaced.

What we have so far. lvraid1 is a 10GB RAID1 logical volume, and lvextra is a regular non-RAID logical volume created from the extra 3GB of free space from vgroup.
Mounting and Testing
![]()
We can format and mount both logical volumes. Go ahead and add some files tot he volumes.
sudo mkfs.ext4 /dev/vgroup/lvraid1             # Format ext4
sudo mkfs.ext4 /dev/vgroup/lvextra             # Format ext4
sudo mkdir /media/lvraid1 /media/lvextra       # Create mount points
sudo mount /dev/vgroup/lvraid1 /media/lvraid1  # Mount
sudo mount /dev/vgroup/lvextra /media/lvextra  # Mount
sudo chmod 777 /media/lvraid1 /media/lvextra   # Not the best permission practice

Formatted and mounted with files written to both lvraid1 and lvextra.
Copy some files to both mounted logical volumes. I uses some default backgrounds and icons from usr/share.
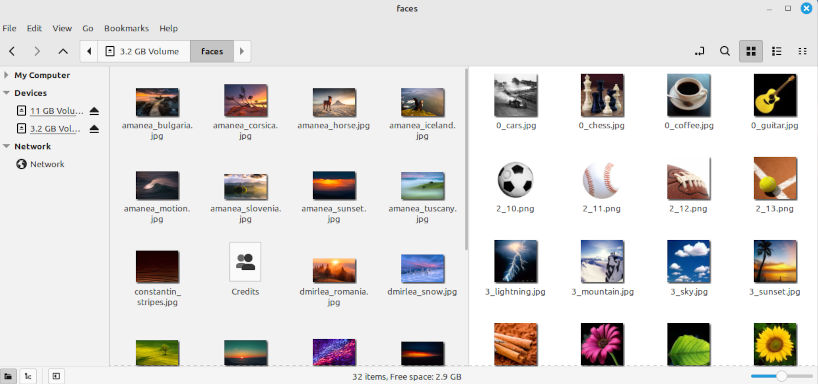
Linux wallpapers and user face icons copied to lvraid1 (left) and lvextra (right). We are going to experiment with both of these logical volumes. Will the files remain accessible after simulating drive failures?
What Happens During a Drive Failure?
Will RAID1 work? Meaning, will we still be able to access the files on lvraid1 if one of the physical drives fail? To simulate this, power off the VM and remove the 10GB virtual drive.
...remount both logical volumes after rebooting...
sudo mount /dev/vgroup/lvraid1 /media/lvraid1
sudo mount /dev/vgroup/lvextra /media/lvextra
Yes! All data is still intact from both logical volumes even though /dev/sdb is missing.
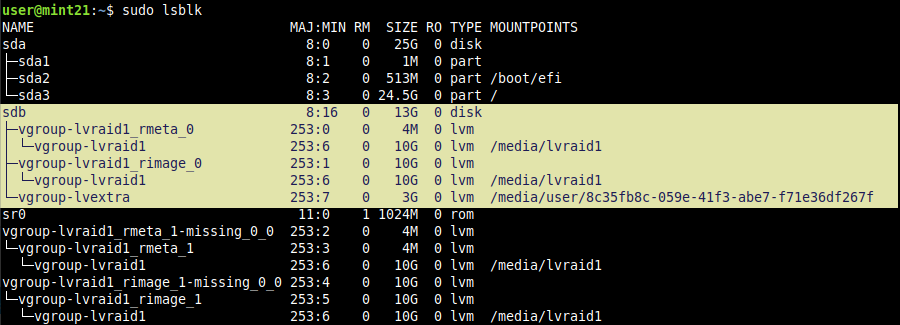
lsblk reveals that /dev/sdb, the 13GB drive, is online, but /dev/sdc, the expected 10GB member disk from the RAID1 array, is not.
In lsblk above, rmeta_1 and rimage_1 read “missing” to tell us that this drive is missing from the array. We can still access the data from the RAID1 array, but it is now operating in a degraded state. We need to restore the failed drive. If the remaining drive fails too, then all data is lost for both lvraid1 and lvextra.
Checking for Missing Drives
sudo lvs -a -o name,devices vgroup

If you see [unknown] when a device file should be for a RAID device, then it means the drive is missing or faulty and cannot be detected by the system.
cat /proc/mdstat
to check for missing disks, but this returns nothing in Linux Mint 21.3 when using LVM RAID.

Nothing useful here because we are using LVM, not mdadm.
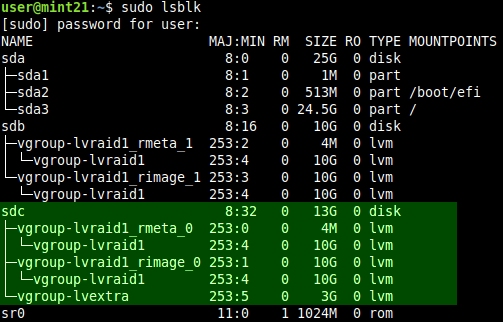
Replacing a Failed Volume
Okay, we know the volume has failed and we need to replace it, but how? We also need to add a new 10GB drive to the system and resync, so what are the commands for that?
Step 1. Add the new drive.
![]()
I powered off the VM and added a blank 10GB virtual hard drive. Rebooted.

The VM now has a blank 10GB hard drive. lsblk still shows a missing volume. This new drive is /dev/sdb.
sudo pvcreate /dev/sdb
sudo vgextend vgroup /dev/sdb

Extending the volume group with the new physical volume is not enough.
sudo pvdisplay for checking free extents. Something to note is that the new drive being added must have a number of free physical extents (Free PE) that is equal to or greater than the Total PE of the failed drive [unknown]. Here, we see pvdisplay providing information about the missing drive even when it is not connected. LVM remembers.
Step 2. Remove the Missing Volume
![]()
We cannot add the new drive to lvraid1 yet because a volume is missing from the volume group, and LVM prevents this from happening until we resolve it.

We need to fix this first.
sudo vgreduce --removemissing vgroup --force
sudo vgextend vgroup /dev/sdb # Only needed if /dev/sdb not added earlier
The –force option is required in this case. But did we lose any data? Remount lvraid1 and lvextra to find out.
sudo mount /dev/vgroup/lvraid1 /media/lvraid1
sudo mount /dev/vgroup/lvextra /media/lvextra
Both drives mounted, and data was intact. All is good. Running vgreduce did not cause a data loss.
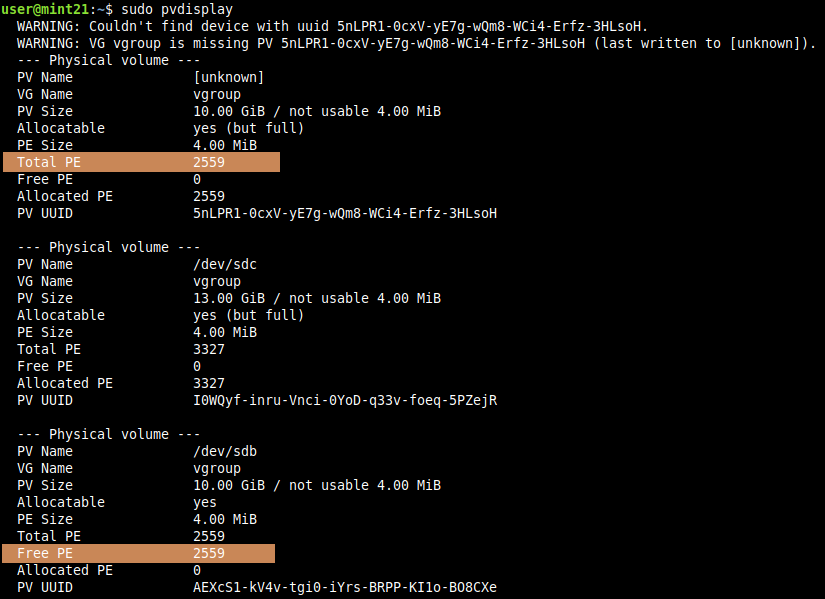
sudo pvdisplay
The missing volume has been removed. Only /dev/sdc, the 13GB volume from before, and the new 10GB volume are listed. /dev/sdb reads 2559 for Free PE, which means it has not been assigned to lvraid1 yet. lvraid1 is still running in a degraded state with one drive.
Step 3. Add the New Volume to lvraid1
![]()
sudo lvconvert -m1 vgroup/lvraid1 /dev/sdb
Usually, we would use lvconvert to add a new drive to an existing RAID1 array. However, we run into a problem. We are trying to add a new drive to a degraded array that remembers the failed drive. We receive an error message when we attempt this:

This would have worked had the array been normal, but lvraid1 already has an image count of 2 even though one is missing. We need to fix this with lvconvert –repair as suggested.
![]()
sudo lvconvert --repair vgroup/lvraid1

Instead of attempting to add another mirror with -m1, we need to repair the faulty array.
![]()
If you run
watch -n1 sudo lvs
in a dedicated terminal, you can watch the resync progress to know when it is finished.
Repairing automatically resyncs with the new 10GB drive and restores RAID1 to its full glory.
Step 4. Verify
sudo pvdisplay
sudo lsblk

pvdisplay shows the new drive, /dev/sdb, with 0 Free PE. This means is has resynced with the logical volume lvraid1, and data is not mirrored again. lsblk shows rmeta_1 and rimage_1 on /dev/sdb to show that it is mirroring data.
lsblk still reported a missing volume. Not certain why it was lingering when all LVM commands returned correct results, but a system reboot fixed it. (I made a VM snapshot at this point.)
Result? It works! And we were able to complete these tasks with lvraid1 mounted.
The “-missing” text shown previously disappeared after a reboot.
Resyncing Progress
RAID might take some time to resync, so how do we know its progress or if it has completed yet? Use lvs and check the Cpy%Sync column to view the progress.
sudo lvs

When Cpy%Sync reads 100%, the resync is complete.
watch -n1 sudo lvs
will present live updates every second in case you want to watch the progress.
What About the Other Volume?
Did we really fix a degraded RAID1 array by adding the new 10GB hard drive? One way to find out is through another real-world test. This time, we will power off the virtual machine and disconnect the 13GB virtual drive so only the 10GB drive remains. Two things should happen:
- lvraid1 will still be accessible
- lvextra should not be accessible
Let’s find out if these are true.
...rebooting vm...
sudo lsblk

Our 13GB virtual drive is no longer connected to the VM, and lvraid1 is reporting it missing. /dev/sdb is the new 10GB virtual drive from earlier.
Try to mount lvraid1 and lvextra.
sudo mount /dev/vgroup/lvraid1 /media/lvraid1
sudo mount /dev/vgroup/lvextra /media/lvextra
lvextra cannot be mounted.
lvraid1 mounts normally, but lvextra fails. This is normal. If a volume is missing, then it cannot be mounted. Since we removed the physical volume for lvextra, it cannot mount.
lvextra is completely lost, and lvraid1 is running in a degraded state.
Reconnecting a Drive
What happens when we restore the missing drive?
Power off the VM, reconnect the virtual hard drive, and power it back on.
Note: In VirtualBox, take note of the virtual disk snapshot to reconnect. The virtual drive I was using actually created multiple snapshots automatically. Restoring the virtual disk file alone was not enough. I had to pick the correct virtual VDI file and then the latest snapshot associated with it. Then and only then could lvraid1 be restored.
sudo lsblk
I’m baaaaaaabk! The 13GB virtual disk drive for lvraid1 and lvextra has been recognized by the system automatically.
Mount the drives.
sudo mount /dev/vgroup/lvraid1 /media/lvraid1
sudo mount /dev/vgroup/lvextra /media/lvextra
Both logical volumes mounted, and all data was intact. Success!
What Did We Accomplish?
This illustrates an important process: replacing a failed drive in an LVM RAID array. We can replace a drive at any time, but to replace one that has failed and is no longer detected by the system requires a few extra steps, which we covered.
After all of that, we have successfully restored our system to the original design.
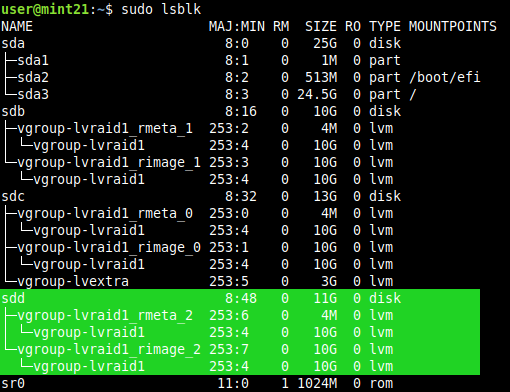
Adding a Third Drive to lvraid1
![]()
For added resiliency, we could add a third drive to the 10GB RAID1 array lvraid1. This requires powering down the VM and adding a new 11GB virtual drive.
...processing...
With that finished, let’s look look at lsblk.
sudo lsblk

Our new drive is /dev/sdd, and it is 11GB in size to distinguish it from the others.
Before we add it to the existing RAID array, open a second terminal with this command so we can watch the resync process later:
watch -n1 sudo lvs
Pay attention to the Cpy%Sync column activity once we run these commands:
sudo pvcreate /dev/sdd                      # Convert to PV
sudo vgextend vgroup /dev/sdd               # Add to VG
sudo lvconvert -m2 vgroup/lvraid1 /dev/sdd  # Watch Cpy%100 after running this

Use -m2. This means use two mirrored drives for the RAID1 array.

Cpy%Sync allows us to view the resync progress as the new drive is added. 100% means this drive is now a full 100% duplicate of existing RAID1 data.
The -m or –mirrors option indicates how many volumes to use in the RAID1 array. This is the number of volumes in addition to the base drive. If we want two mirrored drives in RAID1, then we use -m1. If we want three drives, we use -m2 (base + 2 = 3 drives total).
Check with lsblk.
We now have three volumes in our RAID1 array. LVM uses a separate physical volume for the third drive in the RAID1 array.
Now, our diagram looks like this:

RAID1 (lvraid1) + Standard LVM (lvextra).
Adding a new drive can also be performed while the logical volume is mounted to avoid user disruption. All of this is invisible to the end user.
What About the Extra 1GB?
![]()
Note that with /dev/sdd, the 11GB physical volume, only 10GB is used for the RAID1 array because that is the existing array size. 1GB is left unused as part of the volume group.
sudo vgdisplay
What should we do with this extra 1GB?
To show the flexibility of LVM, let’s extend the size of lvextra from 3GB to 4GB by assigning this space to it.
sudo lvextend -l +100%FREE vgroup/lvextra
Extending a volume does not cause data loss.
Data remains intact when extended and can be performed while mounted.

Nemo reports the correct size for lvextra. However, this was mounted after the extend operation, so that might be a reason.

lvextra will store its data on /dev/sdc and /dev/sdd. If either of these drives fail or if either of these volumes go missing, then lvextra will lose its data. There are now two points of failure for lvextra.
It is great that LVM can achieve this with minimal effort once set up, but the downside is that lvextra is now dependent upon two physical volumes. If either fails, lvextra loses data and cannot be mounted.
Converting RAID1 to RAID5 (RAID Takeover)
![]()
RAID1 works, and it is very resilient right now. However, this resiliency comes at the expense of wasted storage space. No matter how many 10GB drives we add, our RAID1 array will always be 10GB in size unless we resize it.
To show another technique possible with LVM, we will convert our existing RAID1 array into a RAID5 array without losing data. This is referred to as RAID takeover in the lvmraid man page.
RAID5 requires a minimum of three drives to function as intended, which we have, and it has the feature of giving us more storage space with those three drives. Only one drive is allowed to fail with RAID5, but we will get 20GB of capacity with three drives instead of 10GB. Which is best: RAID1 or RAID5? This depends upon you and your needs. For now, let’s see how to do this.
We use the lvconvert command because RAID operates on logical volumes. Physical volumes and volume groups remain the same, and there is no need to make any modifications to them.
lvraid1 and lvextra are mounted.
sudo lvconvert --type raid5 vgroup/lvraid1

Hmm. That did not work. We need to convert our 3-volume RAID1 array into a 2-volume array first.
Removing a Volume from RAID1
![]()
We have three physical volumes behind our RAID1 logical volume. We need to remove one of the volumes . First, get the device files right so we do not accidentally remove the wrong volume.
sudo pvdisplay

/dev/sdd is the volume we want to remove from the RAID1 array.
We picked /dev/sdd because it is also providing the means behind lvextra that we extended earlier. This is to illustrate a point. What if we encounter a situation like this? What will happen? What can we do?
Let’s try.
sudo lvconvert -m1 vgroup/lvraid1
That worked. lvraid1 now only consists of two volumes, but which ones?
sudo lsblk

/dev/sdd is no longer a part of the RAID1 array, but it still contains the lvextra data. lvextra is still working.
lvraid1 uses physical volumes /dev/sdb and /dev/sdc. This means /dev/sdd reallocated 10GB to the volume group.
Did you notice something? We did not specify which volume to remove. /dev/sdd was chosen automatically. If you want to be specific, then indicate the physical volume to remove with the lvconvert command like this:
sudo lvconvert -m1 vgroup/lvraid1 /dev/sdb  # Remove /dev/sdb, or
sudo lvconvert -m1 vgroup/lvraid1 /dev/sdc  # Remove /dev/sdc
Omitting a physical volume leaves it up to LVM to decide.

The volume group vgroup now has 10GB of free space provided by /dev/sdd.
Now that we have only two volumes in the RAID1 array, we can try to convert it into RAID5 again.
sudo lvconvert --type raid5 vgroup/lvraid1

That seemed to work. The –stripes message refers to the –stripes option not allowed in this case, not the fact the stripes are used as a storage block in RAID.
In a similar way that -m1 is used for RAID1, –stripes is used for RAID5 and indicates how many drives to use. When we convert from RAID1 to RAID5, RAID 5 is running with only two volumes without any redundancy yet. It needs three to become a proper RAID5 array.
–type raid5 is the same as raid5_ls. There are a number of different RAID layouts with slight behavior variations behind the scenes. man lvmraid is a technical starting point for more information.
sudo lvs -o name,segtype
lvraid1 has been converted into RAID5.
We have converted the RAID1 logical volume into a RAID5 logical volume, but there are only two volumes. We need to add a third logical volume to lvraid1.
![]()
sudo lvconvert --stripes 2 vgroup/lvraid1

Despite the messages, this worked. lvraid1 now has a 20GB capacity.

We were able to achieve this while keeping this RAID logical volume mounted.

lsblk shows the third drive added to the RAID5 array. lvextra not affected.
Adding a Fourth Drive to RAID5
![]()
![]()
RAID5 is not limited to three drives. We can add another and another to increase storage capacity. However, we are still limited to one failed drive with RAID5 no matter how many we add.
Why would this be useful? It allows RAID 5 to expand in capacity just by adding more drives. With RAID1, capacity remains constant as we add more drives while resiliency increases. If we have four drives in RAID1, then three can fail and it will still work while the capacity (in this example) remains at 10GB.
With RAID5 possessing four drives, only one drive can fail no matter how many we have in the array. But adding another drive to RAID5 increases by 10GB for each new drive added.
Power down the VM and add a 14GB virtual drive.
...processing...
Back. The procedure is the same as before. We will add the new 14GB drive to the existing RAID5 lvraid1 array. (Yes, lvraid1 is an outdated name at this point.)
We can perform these actions with the RAID logical volume mounted or unmounted. Your choice.

Our new 14GB virtual drive is recognized by the system as /dev/sde.
sudo pvcreate /dev/sde          # Create PV
sudo vgextend vgroup /dev/sde   # Add to volume group
sudo lvconvert --type raid5 --stripes 1 vgroup/lvraid1 # Set to 1 stripe
sudo lvconvert --type raid5 --stripes 3 vgroup/lvraid1 # Add two images
To make this work, I had to convert the RAID5 array to one stripe and then run it again with three stripes. Now, all four drives are assigned to lvraid1, which is a RAID5 logical volume. The capacity of the RAID5 array has increased to 30GB. (3 data stripes plus 1 parity stripe evenly distributed across all four volumes.)

Notice that each rimage is now 30GB in size. This is the raw storage capacity available.

Adding a drive to the RAID5 array increases available storage space. However, we are still limited to one drive failure with RAID5 no matter how many drives we add.
Inconsistent Metadata
![]()
During my VM rebooting and virtual disk swapping, I eventually encountered this problem that prevented any further commands from running successfully:

“WARNING: Inconsistent metadata found for this VG” It involved /dev/sde that was added multiple times. Too much testing on my part.
To fix it, run,
sudo vgck --updatemetadata vgroup
sudo pvs

Fixed. Now, /dev/sde appears as a usable device.
Activating a Logical Volume
![]()
Some LVM commands require that a volume be unmounted and deactivated, so you might see this in lvscan:

lvraid1 is inactive. This can be the result of a resync using lvchange.
To Activate
sudo lvchange -ay vgroup/lvraid1
To Deactivate
sudo lvchange -an vgroup/lvraid1
Just like before, use lvconvert to set the number of stripes on the RAID5 logical volume. In this case, set it to 3 stripes. (Base drive + 3 stripes = 4 drives in array)
Convert RAID5 Back to RAID1
![]()
Not all takeovers are possible with LVM RAID. Meaning, it might be possible to convert a RAID array to another but not the other direction. So, it is best to create the proper RAID array you need from the start. Sometimes this is not possible, and you must work with existing data. So, let’s see how to convert our RAID5 array back to a RAID1 array. (lvraid1 is mounted and contains data.)
With three drives in RAID5.
sudo lvconvert --type raid1 vgroup/lvraid1
sudo lsblk

And just like that, we have returned to a RAID1 array consisting of two mirrored volumes.

watch -n1 sudo lvs instantly shows a return to the 10GB capacity under the LSize column.
Converting from 4-way RAID5 to RAID1 does not result in 4-way RAID1. The process reduces to two volumes in the resulting RAID1 array. The other two volumes are freed back to the volume group. If you need to add more drives to the RAID1 array, you must do so manually all over again.
This action was performed while lvraid1 was mounted.
The conversion process completed while the RAID5 logical volume was mounted and in use. There was no need to unmount it first.
CAUTION! This process can destroy data. We went from 30GB to 10GB. The used space was less than either, so there was no problem, but you might be required to move extents with pvmove if too much space is used. Always have backups.
Creating a RAID5 Logical Volume
![]()
“Why not just create a RAID5 logical volume to begin with?”
In practice, this is the best approach. We took the scenic route to show a number of issues that can arise. Let’s remove the entire lvraid1 array and reset the disks by removing lvraid1 and lvextra.
sudo umount /media/lvraid1
sudo umount /media/lvextra
sudo lvremove vgroup/lvraid1 vgroup/lvextra
Using the existing physical volumes and volume group, create a RAID5 array.
sudo lvcreate --type raid5 --stripes 3 -L 8G -n lvraid5 vgroup
Check lsblk to see what this produces.
This creates a RAID5 logical volume 8GB in size, named lvraid5, using four total volumes. The -L 8G means the resulting capacity is 8G total. It will calculate and use 2.7GB from each volume, not 8G. Adding an additional drive will increase the RAID5 capacity by 2.7GB.
sudo lvremove vgroup/lvraid5  # Remove the logical volume so we can try again.

sudo lvcreate --type raid5 --stripes 3 -l 100%FREE -n lvraid5 vgroup
This command will auto-compute the size based upon the free space left on the smallest physical volume in the volume group. The result here is 30GB RAID5. Three stripes for data, and one stripe for parity.
30GB RAID5 logical volume.
10GB are used from each physical volume.
Creating a RAID6 Logical Volume
![]()
LVM RAID requires at least five physical volumes, not four as expected. With mdadm, RAID6 needs a minimum of four drives to assemble a RAID6 array, but not with LVM RAID. Oh, no. That would be too easy to understand and you would not waste hours trying to figure out what is wrong. LVM RAID requires a minimum of five physical volumes. That is the key.
I had the trickiest time figuring this out until I reviewed man lvmraid in detail. Buried within the raid6 section, it specifies a minimum of five physical volumes. After powering off the VM, adding a 16GB virtual drive, and rebooting, this command worked:
sudo lvcreate --type raid6 --stripes 3 -l 100%FREE -n lvraid6 vgroup

Adding a fifth physical volume provides 64GB of available space in the volume group that results in a 30GB RAID6 array.

With five volumes, RAID6 provides 30GB from our test. The array is calculated based upon the free space available from the smallest volume — 10GB. Up to two drives can fail in RAID6.
Creating a RAID10 Logical Volume
![]()
LVM supports RAID levels 0, 1, 4, 5, 6, and 10, so if you have four drives like we do, we can reserve two for parity. This reduces the storage capacity from 30GB to 20GB in RAID10, but it allows up to two hard disks to fail — depending upon where they fail because RAID10 was developed to take into account storage controller hardware.
With RAID6, it does not matter which two drives fail, but with RAID10, if two drives fail on the same controller, then you lose data. The tradeoff is speed while in a degraded state.
We will create a simple RAID10 array using four volumes.
sudo lvremove vgroup/lvraid6     # Remove existing LV
sudo vgreduce vgroup /dev/sdf    # Remove PV so we have four drives
sudo lvcreate --type raid10 -l 100%FREE -n lvraid10 vgroup

RAID10 creates a 20GB logical volume — the same capacity size as RAID6. RAID10 requires at least four volumes. 10GB from each is used in this example.
RAID10 is a hybrid RAID10 system designed to be closer to hardware utilizing a stripe of mirrors. In a VM, I do not notice any performance difference from RAID6. Both offer the same capacity too.
Scrubbing
![]()
Scrubbing performs a full, in-depth scan of the RAID array. All parity is verified to ensure integrity during a full resync.
sudo lvchange --syncaction check vgroup/lvraid5
To perform a repair:
sudo lvchange --syncaction repair vgroup/lvraid6
Soft Data Corruption
This refers to the situation where data might be written to the array intact, but when you read it back, the data is corrupted. Personally, I have never encountered this scenario, but it could happen, and you would never know it until you tried to retrieve a file.
To help mitigate and prevent soft corruption, LVM RAID provides a way to support device mapper integrity (referred to as DM integrity) when you create a RAID logical volume. This adds storage overhead, but it helps ensure that data is not corrupted.
It works by adding an extra subvolume on each physical volume in addition to the existing data and metadata. Every 500MB of data requires 4MB of extra storage for integrity overhead, so account for this if you choose to implement it. For example, if you wish to create a 10GB RAID1 logical volume like we did previously, it would not be possible with DM integrity. You would need to lower the capacity to 8GB since we need to allot space for the extra integrity subvolume.
RAID Logical Volume with DM Integrity
![]()
We create a logical volume as before but with a few extra options. First, let’s remove volumes we do not need.
sudo lvremove vgroup/lvraid10    # Remove existing LV
sudo vgs
sudo pvs

We have five physical volumes.
Pick three to remove. In this case, I will keep /dev/sdb and /dev/sdc.
sudo vgreduce vgroup /dev/sd[d-f]
Next, create a RAID1 logical drive with DM integrity by including the –raidintegrity option. We also need to specify an exact size. You will receive errors if there is not enough space to support RAID integrity, and the volume will not be created.
sudo lvcreate --type raid1 --raidintegrity y -L 8G -n lvraid1 vgroup

lsblk now shows a different subvolume structure than before to hold the integrity metadata for each physical volume. This helps ensure that data stored in this RAID array is not corrupted.
Adding DM Integrity to Existing RAID
To add DM integrity to an existing volume, you will need enough free space.
sudo lvconvert --raidintegrity y vgroup/lvraid6 # An example
This is why the RAID1 array was reduced to 8GB in size instead of the previous 10GB. The integrity metadata needs free space to grow as the logical volume is populated with data.
LVM RAID or mdadm?
“Should I use LVM RAID or mdadm?”
For software RAID, I recommend mdadm.
mdadm is built with a closer connection to RAID hardware in mind and provides better tools for managing RAID arrays due to the lack of LVM’s abstraction between logical drives and physical volumes.
LVM RAID is more complicated, but it allows LVM features to be applied to RAID. Features such as extending or shrinking the size of a volume is simple with LVM but not so much with mdadm.
“What about LVM on top of an mdadm RAID array?”
This works, but it is not recommended. I would recommend using one or the other, not both together, in order to reduce complexity.
Others have reported achieving this, but nothing was glowing in praise from the results. Try it for yourself to see how it works. Personally, I never use this combination. I have had best success with mdadm for RAID drives and LVM for separate linear volumes that benefit from LVM. LVM and mdadm might exist on the same system, but both are in control of a completely different set of drives. mdadm controls the set of RAID drives, and LVM control another group of separate, unrelated drives that do not use RAID.
“What about LVM on top of hardware RAID?”
It should work, but I have never tried. When it comes to hardware RAID, we can treat the underlying RAID as invisible to the software and just concentrate on LVM.
The focus of this article is software RAID, whether it be LVM RAID or mdadm. Both are software RAID implementations, and is not common practice to combine two software RAID systems together. Not impossible, but I rarely ever see this approach.
To keep life simple, pick one software RAID system or the other.
Conclusion
LVM RAID is tricky to understand and get right because documentation is sparse or not intuitive. You are pretty much on your own with trial and error if you choose to implement RAID with LVM. In my experience, LVM is superb for dynamically extended linear volumes, but for LVM RAID…it works but there is an added layer of complexity.
For RAID on Linux, mdadm is the way to go in my opinion, but it is useful to have RAID options.
There is much, much more to LVM RAID than what is covered here, so take a peek at the various man pages and perform your own trial and error experiments to see what LVM can do for yourself.
Have fun!
