📅 March 31, 2024
 Linux has a number of handy technologies built in that have existed for a long time but seem to receive little attention because they are taken for granted or simply not talked about.
One of these is logical volume management (LVM) that allows us to treat hard drive storage space in a way similar to RAM. Comparable to adding another memory stick to expand RAM, we can add more hard drives to expand hard drive storage space. Need more secondary storage? Just add another hard drive.
This simple concept is incredibly versatile and saves time by eliminating the need to backup and restore data following a new drive addition to a system. It requires some extra steps to set up and has a few specific terms to learn, but the benefits are worthwhile.
LVM consists of three layers to create a working storage system. In this part, we will focus on the physical drives themselves, called physical volumes. These can be mechanical hard drives, SSDs, SAS, or even super fast NVMe storage devices.
Why Does LVM Exist?
Much has been written about LVM in Linux, so here is a brief overview: it saves time and allows for expandability without the needing to perform an extensive backup process when running out of space.
In a traditional storage system with a single hard drive for data, suppose 2TB in size, what happens when it is full and you need more space? What do you do? The first thought might be, “Buy a larger hard drive.” Okay, let’s do that. Suppose we purchase a brand new 10TB hard drive (the spinning type because it is cheap). We need to replace the 2TB drive and migrate its data to the new 10TB drive.
![]()
Here is what the process would be like:
- Back up all 2TB of data to…somewhere. We are assuming that you have at least 2TB of free space….somewhere…to store all of the old drive’s data temporarily before it is copied to the new drive.
- Remove the old drive.
- Install the new 10TB drive.
- Format the new drive.
- Copy the backed up data from the 2TB backup to the new 10TB drive. Now, you have more space, but what do you do when the 10TB becomes full? Do you repeat the process with an even larger hard drive?
This entire process is time-consuming due to multiple steps. How do you know that all of the data was backed up without errors? Are you going to use checksums to verify the restored data? What will you do with the old drive? Maybe it is still under warranty and perfectly intact and usable? Will you need ever larger hard drives as you run out of space? These can become expensive.
![]()
Compare that with this technique:
- Install the new 10TB drive into the system
- Add it to the LVM group…with a little setup
That’s it. The new 10TB drive is immediately available as part of the existing 2TB volume by expanding the available storage space. The new drive capacity is added to the existing 2TB capacity for a total of 12TB. No need to back up and restore data. The existing mount point simply grows to the new space by the addition of the new drive. The existing data remains intact on the current drive. All we did was add a new drive to expand the storage.
This is what LVM is all about. LVM solves this kind of problem to reduce downtime and make storage expansion easier to perform. With LVM, we can manage large storage arrays easier than dealing with individual drives. LVM is extremely flexible and can achieve more than this simple explanation, but this illustrates the basic idea. Even RAID is possible with LVM.
Combining Storage
![]()
Another cool benefit of LVM is to create a single storage volume from multiple, smaller drives that you might already have on-hand. For example, suppose you have two NVMe devices lying around. They are perfectly good, but you cannot use them because they are 1TB and 2TB NVMe sticks, and you need at least 3TB of storage space.
Rather than purchasing a much more expensive 4TB NVMe, you can use LVM to combine the 1TB NVMe and the 2TB NVMe into a single 3TB storage volume. No need to purchase an additional 4TB NVMe. Just put the unused NVMe devices to use with LVM!

Two or more low-capacity NVMe devices can be combined in LVM to act as a single, larger-capacity NVMe device. Note: the system must be able to support multiple NVMe devices for this to work.
This is a great way to use older, low-capacity NVMe or SSD devices that are in fine working condition but would otherwise be left unused. The performance is the same as a single NVMe, so there is no performance loss with LVM.
Another LVM possibility. Assuming a system is capable of hosting multiple NVMe devices, LVM allows several low-capacity drives (including SSD and mechanical drives) to be treated as single, larger capacity storage volumes. Here, we have created two logical volumes that are treated as two separate mounted storage drives. A technique like this breathes new life into drives that might be wasted.
“Isn’t this the same as JBOD?”
Very similar. JBOD (Just a Bunch Of Disks) or disk spanning is usually associated with software or hardware RAID controllers. The end result is similar, but the implementation (how to set it up) is different.
LVM offers two important advantages over JBOD: snapshots and migration. LVM allows you take snapshots of your entire file system for backup purposes, and migration makes it easy to move data around. Suppose you know a drive is failing or at the end of its life and you need to replace. With LVM, you can migrate the data from the failing device to the new device before removing it. All in-place. No need to back up and restore data or create a new logical volume. The underlying mechanics are invisible to the end user. This ability to move file systems around is a tremendous advantage.
“What if a single drive fails?”
Then, you lose all data on that volume. Even if the other drives in a volume group are intact, a single failed drive causes a complete data loss for its entire volume group. You will need to replace the drive and start over with the volume group.
Suppose you have two NVMe (or SSD or HDD) devices creating a single logical volume and one fails in some way. All data is lost on that volume group. If a physical volume is missing from a volume group, then that logical volume cannot be mounted. Yes, there can be more failure points introduced when we rely upon multiple physical volumes, but if using a single disk, all data would be lost anyway. This is why you should always have data backups no matter if you use a regular drive by itself, RAID, JBOD, or LVM.
LVM used by itself is not RAID and offers no data protection over a single drive. (RAID with LVM is another matter not covered here.)
What Kind of Drives?
LVM dates back to the days of mechanical hard drives, but it will work with any storage medium, such as SSDs and NVMe devices. However, I recommend to limiting it to devices connected directly to a storage controller or motherboard. This means using SATA SSD drives and M.2 NVMe, but not external USB devices. USB should work too, in theory, but I have not tried it for a number of reasons related to USB problems (speed, accidental disconnects, failures, and more).
We can even use LVM with virtual hard disks in virtual machines. In this example, we will use VirtualBox running Linux Mint 21.3 to set up an LVM storage system from multiple virtual disks.
LVM Layers
![]()
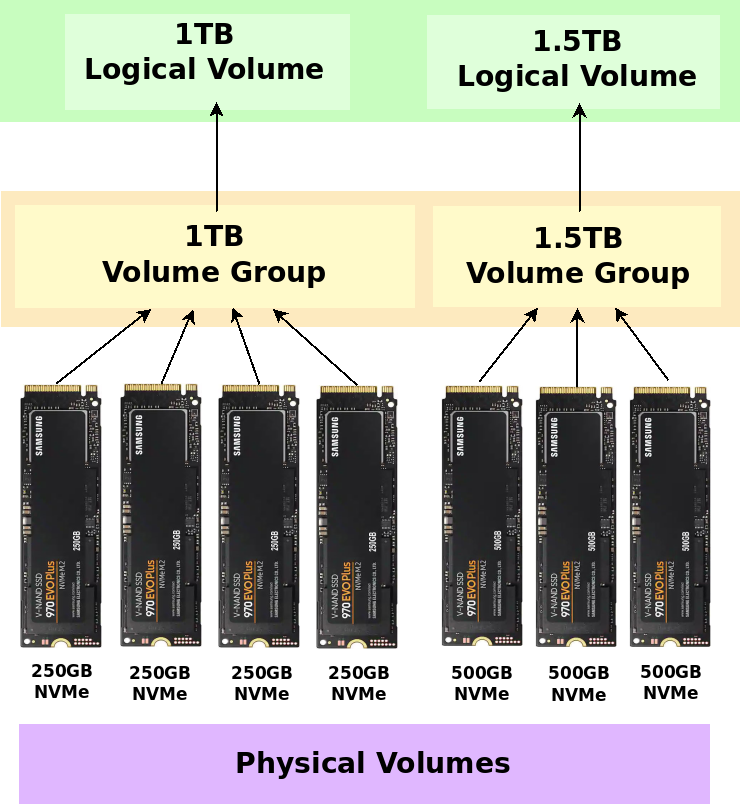
LVM consists of three parts:
- Logical Volume (What we use. Highest level closest to the user. )
- Volume Group (A group of selected physical volumes from which a logical volume is made)
- Physical Volume (The actual hard drive. Lowest level closest to the hardware.)

LVM involves more abstraction between the users and the physical hardware drives, but it is far, far more flexible and easier to manage in the long term. You can create very large data arrays by treating multiple drives as one. Note: Even though spinning mechanical drives are shown in the image, SSDs and NVMe devices will also work.
Shown here is a very simple LVM arrangement that we will create in this series. There are three 10GB virtual hard drives that are treated as a single 30GB logical drive that users see. If we need to expand the storage available to the users, then all we need to do is add another 10GB drive to the volume group. Again, this is a very simple arrangement. You can create, mix, and match almost any combination of drives and partitions you like to meet your needs by creating multiple volume groups and logical volumes.
LVM Formatting
![]()
The sizes quoted are raw, unformatted capacities. Just like a regular drive, the usable space will be 7% less than its advertised capacity. In the 30GB example above, the usable capacity will be about 27,900,000,000 bytes after formatting and setting reserved blocks to 0. (Reserved blocks are 5% in Linux for a total of 12% less usable space if not turned off. 7% + 5% = 12%)
Why is this important with LVM? As an example, if you need to store 500GB of data on a logical volume, then two 250GB SSDs will not be enough. You must take into account the file system overhead. To store 500GB of data after formatting, you will need at least 560GB of raw, unformatted storage space in the logical volume because formatting reduces it by 7% and Linux reserves and additional 5% on top of that in the form of reserved blocks. The reserved blocks are unneeded for data drives and can be set to 0, but you will still lose about 7% after a format. This is normal.
So, you will need to add a third NVMe to the existing two 250GB NVMe devices in order to eventually store 500GB worth of data on a formatted logical volume. Given NVMe capacities are usually multiples of 250GB, realistically, this means adding a 120GB or 250GB NVMe to the mix for a total of 620GB or 750GB of raw capacity. Both are more than required for 500GB of data.
However, we can specify exactly how much space from a volume group to use in a logical volume, so we can have a logical volume of exactly 560GB. The point is that the physical volumes (the actual hardware that we use) is often available in fixed-multiple capacities, such as 250G or 500GB, that we must work with when adding hardware.
Hard Disk Abstraction
![]()
LVM creates an abstraction layer between the user and the actual hard drives. With LVM, we do not access a hard drive directly like we do a regular drive by mounting /dev/sdb1, for example. Instead, we create a physical volume (the actual hard drive), assign it to a volume group, and then create a logical volume from the volume group.
While this might sound complicated, it exists in order to offer almost any kind of flexible hard drive arrangement you can think of while also offering easy expandability. Need more space in a given logical volume? Just add another drive to the system, and assign it to a volume group. Done. You now have more storage capacity without the tedious process of backing up data, partitioning, and then restoring the data to the new partition. Existing data remains untouched.
Let’s see how to add a physical volume.
Virtual Lab for Testing
LVM is best used with physical hardware, but a virtual machine will also work for demonstration. The LVM process is the same for both. For this example, I installed a new Linux Mint 21.3 VM in VirtualBox for demonstration. Guest additions were also installed.
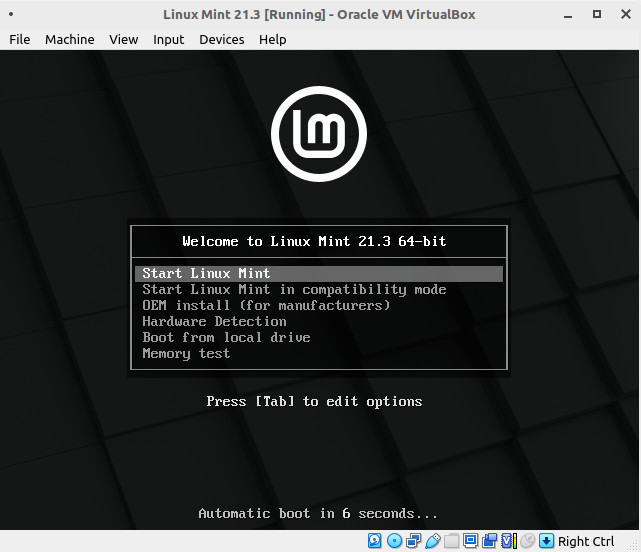
Linux Mint 21.3 installation in VirtualBox. We can add physical volumes as separate virtual hard drives later, so there is no need to add virtual hard drives during installation.
Installing LVM
In Linux Mint 21.3, LVM is already installed and ready to go by default. If you are using a different distribution and find it missing, just install LVM2. It is available for free from the Ubuntu repository.
sudo apt install lvm2
You can check if it exists by running pvcreate from the terminal.

If you see this when running pvcreate, then it means LVM is installed.
Physical Volume
![]()
 A physical volume is created from the actual, physical hard drive/SSD/NVMe/SAS that you can hold in your hand, drop on the floor (hopefully not), install in a computer, and wonder, “How will I recuperate the cost? This was expensive!” It is the actual storage hardware. Hence, its name: physical volume. It represents an actual piece of storage hardware.
But! A physical volume can also be a partition!
Yes, you read that correctly, we can use partitions on a hard drive or the entire hard drive itself as a physical volume. Partitions can exist on mechanical drives, SSDs, or NVMe devices. A partition is a partition no matter which device it exists on, and if you can create one, then LVM can use it. We can even use a mixture of partitions from multiple hard drives and entire hard drives together. LVM does not care. Both are allowed. When we create a physical volume, we are actually defining a partition or entire hard drive to use for LVM, and we decide what will become a physical volume or not.
You can have as many physical volumes/hard drives/SSDs/NVME/partitions as your system will support. There is no limit. Any number can be added to an LVM system. You can install multiple SATA storage controllers to expand the drives connected. All will work with LVM. You can have multiple LVM groups too, but as a rule, I prefer to keep all drives in volume group of the same hardware type. For example, one volume group consists of nothing but mechanical drives. Another volume group consists of only SSDs, and another consists of only NVMe devices. Personally, I do not mix and match mechanical drives with NVMe devices in the same volume group for performance reasons.

If your motherboard does not have enough SATA ports, more SATA ports can be added using a PCIe SATA expansion card similar to this one that adds four additional SATA ports. LVM does not care how the SATA drives are connected. If it can find a SATA device, it will work with LVM.

LVM works with NVMe too. If you prefer to use multiple NVMe devices but your motherboard does not support as many as you would like, then you can always install NVMe to PCIe adapter cards to add more NVMe devices. Just check if your motherboard can support enough PCIe lanes (CPU and motherboard chipset lanes; check your manual) to accommodate the additional cards and devices. Adding another PCIe-NVMe adapter will not guarantee that the NVMe will be recognized by your system if you do not have enough PCIe lanes. Also, note that the purple dual M.2 adapter card shown in the image requires a motherboard that supports PCIe bifurcation or else only one NVMe device is detected.
PCIe adapter cards allow more SATA or NVMe devices to be connected to the system, and these can be converted into physical volumes.
LVM Physical Volume Commands
LVM has a set of commands that interact with physical volumes. All of them begin with the letters pv.
pvchange   - Change physical volume attributes
pvck       - Check physical volume metadata. Is it marked for LVM?
pvcreate   - Create a physical volume from a drive or partition
pvdisplay  - Show more detailed physical volume info than pvs provides
pvmove     - Relocate extents from on physical volume to another
pvremove   - Remove the LVM marking on a physical volume. Return to a normal drive.
pvresize   - Resize a physical volume
pvs        - Brief info about physical volumes
pvscan     - List all physical volumes
We will cover only the most essential commands for simplicity: pvcreate, pvdisplay, pvs, pvscan, and pvremove.
Creating a Physical Volume
![]()
This is the first thing we need to do in our LVM setup. When we create a physical volume, we are telling LVM what storage device to use. This marks a drive/partition for use by LVM. This way, we choose what drives are considered a part of the LVM and which drives are not. LVM does not automatically add drives detect on your system. We must specify which devices will be used. This way, the OS installation drive or other drives can be excluded.
We are going to create an LVM system whose sole purpose is to store data. OS is on a separate, non-LVM virtual drive. By using LVM for data, if we ever run out of storage space and need more, all we need to do is add another drive, and the capacity is increased by that much extra storage space.
One Physical Volume
This is the most basic possible.
sudo pvcreate /dev/sdb
Output
Physical volume "/dev/sdb" successfully created.
All LVM commands requires sudo privileges. pvcreate creates a physical volume from an existing hard drive/partition. In this example, /dev/sdb is an entire virtual hard drive exactly 10G in size.
Multiple Physical Volumes
It is not necessary to run pvcreate multiple times for multiple drives. We can specify multiple drives/partitions with a single pvcreate.
sudo pvcreate /dev/sdb /dev/sdc /dev/sdd
Output
Physical volume "/dev/sdb" successfully created.
Physical volume "/dev/sdc" successfully created.
Physical volume "/dev/sdd" successfully created.
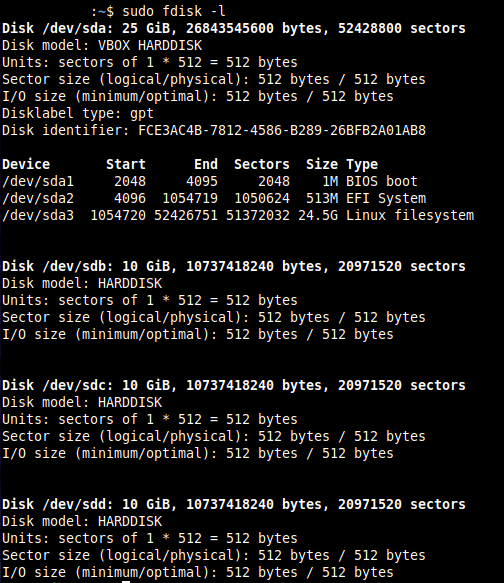
VM with four hard drives. /dev/sda is the OS, Linux Mint 21.3. The other three are separate virtual drives that we want to convert for LVM use.
Drives + Partitions
![]()
What if we have a drive containing partitions?

gparted was used to create two partitions on /dev/sdc. These partitions were formatted as ext4 to show what happens when we create physical volumes from them.
sudo pvcreate /dev/sdb /dev/sdc1 /dev/sdc2 /dev/sdd
Warning: Creating a physical volume will lose the any data stored on the drive or partition!
Output
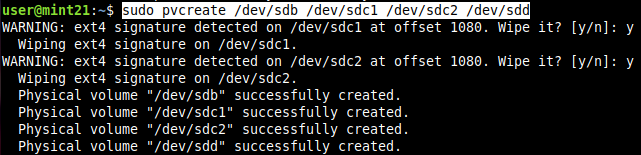
We can create physical volumes from partitions and entire drives.
If a partition or drive is already formatted, then you will receive a confirmation prompt asking if you want to continue by wiping the device. You will lose any data on the specific device, so be certain that you have backups. For new devices/partitions, this is not an issue, but always double check that you have important data backed up and that you are using the proper device.
Notice that four physical volumes are created above but there are only three virtual hard drives. This is because /dev/sdc contains two partitions, /dev/sdc1 and /dev/sdc2, making a total of four physical volumes.
Checking for Physical Volumes
![]()
Does a system contain any physical volumes? Use pvscan to find out.
sudo pvscan

Three physical volumes found. This is from a different set of drives, and none contained partitions.
If you ever wonder, “Do any physical volumes exists on this system?” then pvscan is a good starting point.
Viewing Physical Volume Info
![]()
Did we really just create a physical volume? What if this is a new system and we are unsure of what physical volumes already exist? Use the pvs command to get a brief overview.
sudo pvs
Output

Brief physical volume info shown. The VG column is empty because we have not yet assigned any physical volumes to any volume groups yet.
pvs shows all physical volumes on the system just like pvscan. Notice that /dev/sda does not appear since it is the OS drive, and it was not created as a physical volume during installation. Only the devices we specified will be used for LVM.
Even More Detail
![]()
The pvdisplay command will show further information about all physical volumes.
sudo pvdisplay

Even more information is provided. Since these are freshly-created physical volumes, the volume group name is missing and some sizes are 0. This will change as we use them later.
Information About a Single Physical Volume
By default, pvdisplay and pvs show information about all detected physical volumes, but we can grab information about a specific device only if we wish.
sudo pvdisplay /dev/sdc2
sudo pvs /dev/sdc2
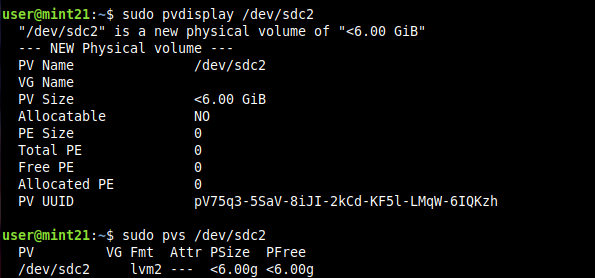
Using a PV (physical volume) name (the device) will show information about that device only in order to narrow down results.
Oops! How to Remove a Physical Volume
![]()
Suppose we made a mistake and created a physical volume out of the wrong drive. The data is lost, but we want to remove it from LVM detection and change it back into a regular drive.
sudo pvremove /dev/sdb
Output
Labels on physical volume "/dev/sdb" successfully wiped.
Now, if we run pvs or pvdisplay, /dev/sdb no longer appears.

/dev/sdb is now a plain drive. It will not be used with LVM anymore.
Let’s remove the others too.
sudo pvremove /dev/sdc
Output
Cannot use /dev/sdc: device is partitioned
Oops! /dev/sdc contains partitions. We must remove the partitions one by one.
sudo pvremove /dev/sdc1 /dev/sdc2 /dev/sdd

The listed partitions/drives are removed from LVM.
If we run pvs or pvdisplay now, no physical volumes will appear.
Creating Three Physical Volumes
gparted removed the partitions from /dev/sdc so we can create three physical volumes from three hard drives for a 1:1 matching in future examples.
sudo pvcreate /dev/sdb /dev/sdc /dev/sdd

Since /dev/sdc previously held partitions, it had an msdos partition type that was still present. We need to wipe it in order to create a physical volume, and this is why the confirmation appears. This is normal. Keep in mind that wiping loses data.

We now have three physical volumes created from three virtual hard drives.
Our LVM So Far
We have created three physical volumes, but we cannot use them yet. We have two steps to go before users can read and write data. Physical volumes must belong to a volume group from which a logical volume is created that is then mounted at a given mount point that users can interact with. Creating physical volumes does not do that, so this will be handled later.

Our progress so far. Three 10GB physical volumes have been created, but they are inaccessible to users. We will eventually create a single 30GB logical volume that we can treat as a regular drive like we normally would.
Conclusion
This is the all-important first step of using LVM: creating physical volumes. We still need to assign them to a volume group, which will be covered in part 2. Keep in mind that LVM is not a panacea for everyone and every situation. LVM offers features that make file system and disk management easier, so if you do not need LVM, then there is no requirement to use it.
I find that LVM is so practical for future growth that I use it anyway. I observe identical performance with or without LVM, so why not use it?
Have fun!
