📅 November 2, 2019
 Have you heard of an Intel NUC?
A NUC (Next Unit of Computing) is a full-fledged computer system packed in a small — SMALL! — compact case that utilizes minimal power. Almost anything you can do with a desktop system you can also do with a NUC, and the performance is about equivalent to a desktop system depending upon the version of NUC you are using. It is great for a light-weight, miniature computer system, and it supports Linux!
I had the chance to play with a NUC and Xubuntu 19.10 lately, and this is the first of a multi-part series of articles that shows a few adventures I had with it.
The goal is to build a standalone Xubuntu 19.10 computer system running Pi-Hole, acting as a NAS (complete with FTP and SSH servers), and utilizing link aggregation (bonding) using two gigabit Ethernet ports to double the network throughput to 2Gbps instead of 1Gbps to test DLNA media server features.
This first part will focus on the hardware side of things, benchmarking NVMe and SSD performance with CrystalDiskMark in Windows 10, and then installing Xubuntu 19.10.
Ready? Let’s get started!
NUC or Raspberry Pi?
“I have a Raspberry Pi. Why build this?”
The Raspberry Pi is great. However, if you find yourself overusing the Pi 2 or Pi 3 to the point where it tends to lock up (forcing a reboot) and file transfers take too long due to its USB 2.0 ports and 100Mbps Ethernet port, then you might want to consider using a NUC instead. Yes, a NUC costs more, but it is much, much faster than a Pi. You will get what you pay for.
While the Raspberry Pi 4 offers better USB 3 ports and gigabit Ethernet, a NUC allows you to use up to 32GB (64GB according to some reports) of RAM, and all USB ports are 10Gbps. Check your needs to see what will work best for your situation.
Powerwise, the NUC consumes about 18W under moderate to full load while the Pi 3 consumes about 5 to 8W of power. (Measured with a Kill-A-Watt power meter.)
The Hardware
Since a NUC is pretty much a complete computer on its own, there is very little to purchase. The version of NUC I am using in this experiment is the Intel NUC8i3BEH (Eighth generation i3). RAM and storage must be purchased and installed separately. This is great for customization and future upgrades.
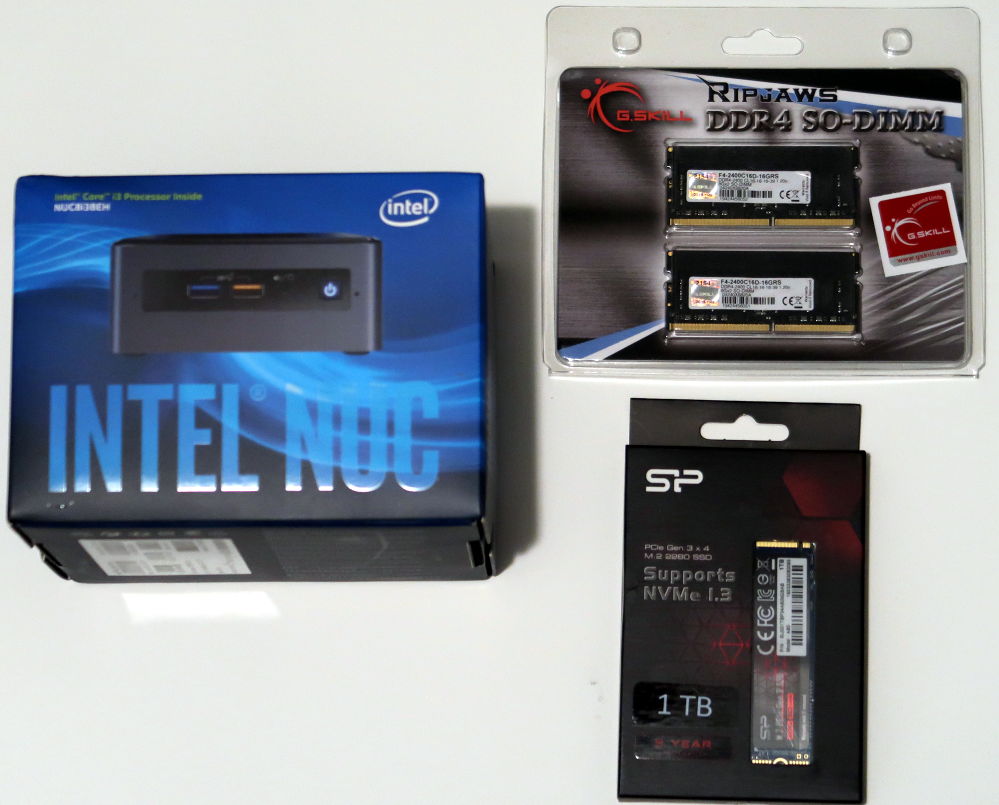
Intel NUC8i3BEH in box, G.Skill Ripjaws DDR4 SO-DIMM (16GB), and Silicon Power NVMe PCIe Gen 3 1TB for storage. These three items construct a fully working mini-computer. The NUC uses built-in graphics, so there is no need to purchase a graphics card of any kind.

The Silicon Power NVMe out of the box shown with a 250G Samsung 840 SSD that wanted attention. Since the NUC8i3BEH supports NVMe and a SATA SSD, I will be using both of these.

The WD Blue 1TB SSD is a new drive that I had the opportunity to test with the NUC. Packaging is minimal for the drive.

This is a fine SSD that offers 1TB of storage. While the 250G Samsung is intended for main use, a 1TB SSD doubles the available storage capacity to 2TB (1TB NVMe + 1TB SSD). I will be testing this with Xubuntu.
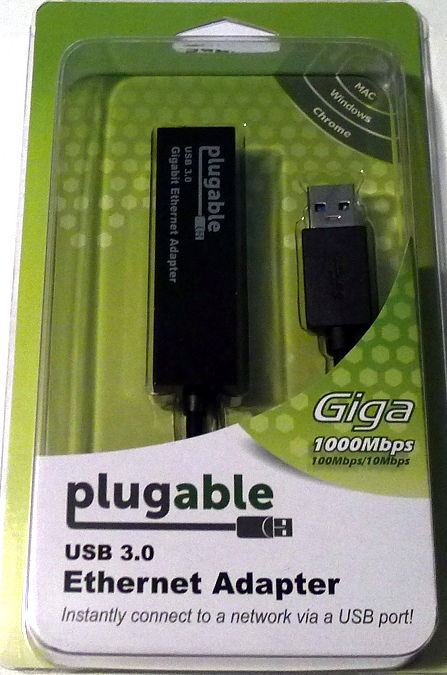
The Plugable USB 3.0 Ethernet Adapter. Since the NUC only has one gigabit Ethernet port, this will be used to supply a second gigabit Ethernet port for link aggregation. The two Ethernet ports will be bonded together (through software) to provide up to 2000Mbps throughput.
Parts List
All components listed are 100% compatible with Linux (Xubuntu 19.10) without the need for drivers or special installations.
Nobody sponsors this. I found a project that I had fun with and wanted to share the knowledge. The links below are affiliate links to help others find the parts and to help cover the time and effort spent researching and writing this article at no cost to readers.
- Intel NUC8i3BEH – Dual Core i3 with space for a SATA SSD.
- G.SKILL Ripjaws DDR4-2400 16GB (8GB x 2 modules)
- Silicon Power 1TB NVMe M.2 PCIe Gen 3 x4
- Plugable USB 3.0 Ethernet Adapter
- Samsung 860 EVO 250GB SSD – The Samsung 840 SSD I am using is an old drive no longer sold, but the 860 EVO should work even better. Regular 2.5″ SATA drives are compatible.
- Western Digital Blue 1TB SSD – For testing, I had one of these newer SSDs to try out. It performs perfectly with Xubuntu 19.10 and the NUC.
- Kill-A-Watt Electricity Monitor – For testing power draw of the NUC. This is a useful piece of equipment to have in any toolbox. Great for measuring watts and amps as the NUC is running.
The keyboard, mouse, and monitor are not included in the parts list. These items were already on hand, so they did not require an extra purchase. The end result is to build a headless unit where none of these items are required for daily operation. They will only be used for the initial setup.
About the NUC8i3BEH
This contains the eighth generation i3 processor, and there are two versions:
- NUC8i3BEH – Supports an extra SSD drive in addition to M.2 storage.
- NUC8i3BEK – Shorter height form factor, but no SSD. Only NVMe allowed.
Between the two, the NUC8i3BEH might be the better option for future storage expansion. It supports an SSD drive while the NUC8i3BEK version does not. This way, if you need to expand later on, you can add a SATA 2.5″ drive.
Even though the NUC8i3BEH is considered “tall” at 51mm, it is a very small device. Both versions are small enough to hold in the hand.
15mm Drive Height
NOTE: 15mm-high drives will not fit. This means that you cannot use a 5TB Seagate laptop drive or any other drive that is 15mm in height without modifying the NUC in some way. A free download is available that lets you 3D print extra parts to accommodate the thicker drives. 7mm drives, such as the Samsung SSD and WD Blue SSDs listed, fit perfectly.
The Memory
A NUC uses laptop RAM. This is 260-pin SO-DIMM DDR4 2400 memory. There are two SO-DIMM slots inside the NUC, so one or two modules can be installed. While the official documentation advertises a maximum of 32GB supported using two 16GB modules, I have read articles where 64GB worked using two 32GB modules.
To keep the cost low while still providing sufficient memory, I opted for 16GB using two 8GB modules.
NVMe
One M.2 slot supports PCIe Gen 3 x4 NVMe storage. M-key only. B-key will not work. Maximum dimension is 2280.
Best of all, Xubuntu 19.10 automatically detects the Silicon Power 1TB NVMe storage and allows a full operating system installation on it. After installation, Xubuntu boots from the NVMe.
What’s Inside the Box?
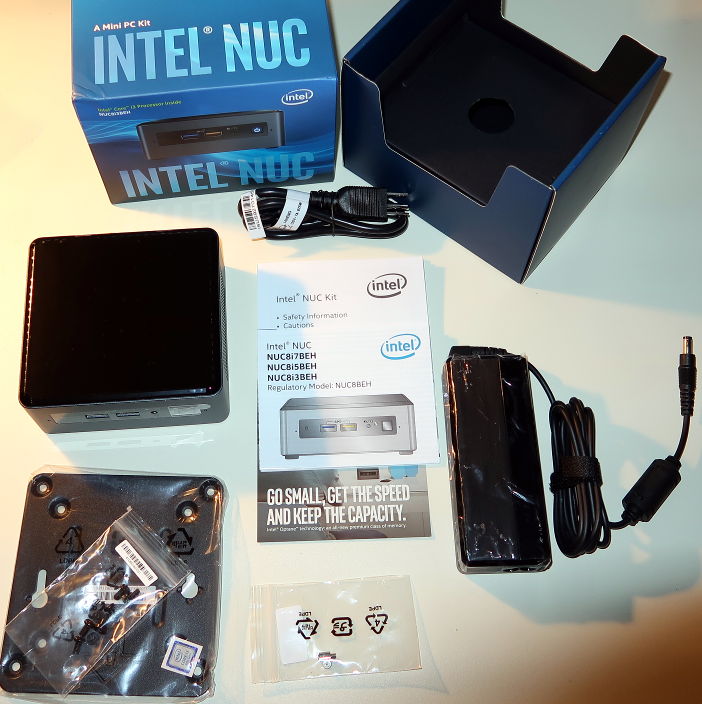
The tiny box includes the NUC, a metal VESA mounting bracket in case you want to mount it on the back of a computer monitor, an external power brick, paper, and mounting screws. Everything you need is shown here minus the memory and storage.
The NUC is smaller than pictures reveal. If you have never held one before, you will instinctively think, “Wow, this is smaller than I expected!” It measures about 11cm wide by 11cm long by 5cm tall. I was surprised by how tiny this actually was in person. Build quality is sturdy, and it feels like a quality piece of electronics with metal vents and a metal base. Nothing feels cheap.
Here is more information from the official product support page.
Installing the Components
Simply unscrew the four screws located at the bottom of the case and remove it. Quarters might be cramped, but everything is easily accessible.

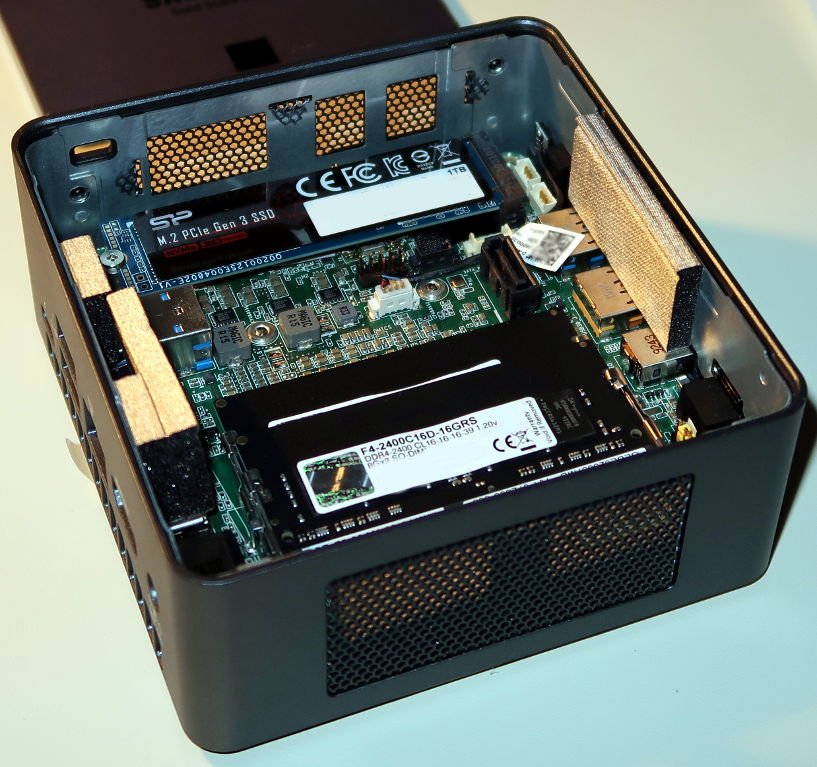
NUC8i3BEH upside down with the bottom removed. As shipped, no memory or storage is included.
Notice the lone SATA port on the board? This supports SATA III. A drive bay allows one 2.5″ SATA drive to fit, and it plugs into this slot along with a custom SATA power connector. 15mm 2.5″ drives will not fit unmodded.

Metal drive caddy houses the SSD. The drive slides in and plugs into the SATA III connector. The SATA cable and the smaller, white power connector then plug into the SATA and power ports on the NUC.
Notice the white/yellow strip adhered to the metal drive bay in the picture above? When fitted in the NUC, that is a soft thermal strip that covers the NVMe drive to improve heat dissipation. The NUC device, while compact, was thought out well to optimize heat transfer.

Here is another view of the drive caddy with the WD Blue 1TB SSD installed. Only one SSD can be installed at a time, not two. I tested the NUC with both SSDs by swapping them out individually.

RAM and NVMe installs quickly and easily.
This is probably the easiest computer I have ever built.

And if you get stuck, the full-color sheet provides pictures to tell the story.
After reassembling the unit, it was time to perform a few tests.
CrystalDiskMark
Does the NUC offer fast performance with the NVMe and SSD drives?
I installed Windows 10 in order to run CrystalDiskMark 6.0.2 to find out.
Set NUC BIOS
Before I could install Windows 10 for testing, I had to enter BIOS and update it. The update file was available for free from Intel’s web site. Just download it, extract it, and save it to the root of a USB stick.
Upon powering on the NUC, press the F2 key on the keyboard (you did plug one in, right?) to enter BIOS. At first, the F2 prompt did not appear, so I had to guess when to press F2. After a few reboots and retries, BIOS finally appeared. It was a tricky thing to achieve when facing a black screen.
Then, update the BIOS. This is achieved from within the BIOS menus. Choose to show the F2 prompt. Reboot. Enter BIOS again, and then set the first boot device to be the USB. Reboot. Install an operating system from a LiveUSB. I used Etcher to create one from an ISO image.
Silicon Power 1TB NVMe
Samsung was my top pick, but I wanted 1TB of NVMe storage without Samsung’s prices. So, I took a risk with Silicon Power’s offering. Here is what CrystalDiskMark reported:

Silicon Power 1TB NVMe PCIe x4.
Hey! This is better than I was expecting. The back of the box boasts “up to” 3200 MB/s reads and 3000 MB/s writes, so this is good news. I ran this test multiple times, and the numbers were fairly consistent as shown. For a lesser-known brand that has not impressed me very much with their SSDs in the past, I would say this one lives up to its claims. Plus, it has a 5-year warranty.
The important point is that the NUC offers full NVMe PCIe Gen 3 support without limiting the throughput. This is the kind of performance I have seen on full-fledged desktop systems.
Samsung 840 SSD
Yes, this is an older drive, but let’s see how it performs in the NUC. Remember, this is connected to a SATA III interface.

Samsung 840 SSD 250G results. SATA III port.
Very good results for SATA. This is identical to how the drive performs in a desktop system, and read speeds reach the limit for the SATA III interface.
The important point is that the NUC is not limiting SATA or NVMe performance. The only limiting factor is the drive itself.
As for the rest of Windows 10, it worked flawlessly. No delays, crashes, or drivers to install. Windows 10 performed as fast as it did on any other 8th generation i3 system.
Raspberry Pi vs. NUC
From CrystalDiskMark, we see what is probably the main advantage of using a NUC over a Pi: storage speed. The Raspberry Pi 2/3 models are limited to USB 2.0 speeds and microSD speeds when transferring files even over a network when using it as a simple, low-power NAS. In everyday usage, this is about 8 to 12MB/s for reads and writes. With NVMe and SSD, we are achieving results identical to desktop systems. So, if you use a Pi as a NAS, then the storage speeds of NVMe and SSD alone provide benefits.
Again, to use a Pi or NUC depends upon the intended purpose.
Enough Windows 10. Linux is the pinnacle of excitement and innovation, so let’s look at Xubuntu 19.10 next!
Xubuntu 19.10 Installation
Ubuntu 19.10 was released a few days ago as of the time of this writing. This also means that the Ubuntu derivatives were also updated to 19.10. Xubuntu 19.10 is an excellent Linux distribution for the NUC because the Xfce desktop environment requires low resources to run.
Even though this project aims to be headless, I wanted a minimal GUI to explore the NUC, so Xubuntu is perfect!
Installation is simple. Create a LiveUSB from the free ISO image, and boot the NUC. To take advantage of the NVMe speeds, Xubuntu was installed on the NVMe storage.

Xubuntu 19.10 partitioning.
For this project, the 1TB NVMe storage was partitioned into a 30GB OS partition and the remainder left for the data partition to keep the OS and data separate.
- /dev/nvme0n1p1 – Xubuntu 19.10 operating system
- /dev/nvme0n1p2 – Future data area
IMPORTANT: When selecting “Device for boot loader installation,” choose the entire NVMe itself (/dev/nvme0n1 in this case). Do not choose a partition for the boot loader. It will not work, and the system will not boot.

Xubuntu 19.10 installs normally.
Xubuntu 19.10 installed from a USB 3.0 stick to the NVMe drive in only a few minutes. It took FAR less time to install than Windows 10 (Ick!). I encountered no issues at all during the Xubuntu 19.10 installation. If you have installed Xubuntu before, then everything will be familiar.

A fresh Xubuntu 19.10 desktop on the NUC!
Xubuntu 19.10 runs fast and snappy on the i3 NUC. Even though the NUC8i3BEH is a dual-core i3 processor, is provides more than enough computing power for Xubuntu. Performance was the same as on a desktop computer during my exploration. Internet was fast. Programs booted fast and snappy. No crashes or issues. Graphics were crisp and snappy without any graphical lag when dragging windows around.
Post-Install Tweaks
After installing Xubuntu 19.10, there are few things you might want to do. Internet connection required, so plug a network cable into the NUC. (Wireless connectivity is also built into the NUC.)
- Incomplete Language Support
- System Problem Detected
- Install net-tools and other tools
- Install uptimed
- Update the System
- Install neofetch and screenfetch
Incomplete Language Support

Xubuntu wants to install extra language files.
If you see this dialog on the desktop, go ahead and install the extra languages by clicking Run this action now. Internet required.
System Problem Detected
Even Ubuntu displays this from time to time, and it looks something like this (Ubuntu):

Xubuntu might show a dialog similar to this upon boot.
While the Xubuntu system did not crash, this popup appeared each time the system booted. I have also seen it appear on other Xubuntu installations. Do not bother reporting it. It is innocuous, so let’s remove it.
Step 1. Remove the crash files.
sudo rm /var/crash/*
Step 2. Disable apport
Open /etc/default/apport in a text editor, such as Mousepad, xed, or gedit.
sudo mousepad /etc/default/apport
Edit the line, or if missing, change the enabled line to 0, so it reads:
enabled=0
Save the file, and close the text editor.
Install net-tools and other tools

ifconfig on a NUC with link aggregation running.
In the future, we will want ifconfig. This is not installed by default, so let’s install it manually.
sudo apt install net-tools
Also, install some extra network tools. These are for monitoring the network via the command line, which we will do remotely via SSH.
sudo apt install bmon iftop slurm
Install uptimed
The program uprecords let’s us see how long Xubuntu has been running. It is for stats, mainly, but this information can be useful in case the system crashes and you need to know when that happened.
sudo apt install uptimed
To view system uptime, enter uprecords at a command prompt.

uprecords reports current system uptime. This example only shown a single system boot, but had there been others, their information would have appeared.
Update the System
Update the system either from the GUI prompt or the command line.
sudo apt update
sudo apt upgrade
Install neofetch and screenfetch
If we plane to use the terminal often, why not make it fun? Both programs display system information along with ASCII art of the detected Linux distribution.
sudo apt install neofetch screenfetch
neofetch

neofetch shows the Ubuntu logo on Xubuntu 19.10.
screenfetch

screenfetch with different ASCII art!
Xubuntu Disks Benchmark
How well do the NVMe and SSD devices perform in Xubuntu?
Install the gnome-disk-utility
sudo apt install gnome-disk-utility

Disks is a utility that looks similar to this, and it contains a benchmarking program.
Silicon Power 1TB NVMe

Disks running three different tests for the Silicon Power NVMe.
Performance was good. I was expecting the read speeds to be around 3 GB/s, and they were.
Samsung 840 250G SSD

Disks running the same three tests with the Samsung 840 SSD.
Results are as good as they can be for the Samsung 840 SSD. Read speeds are limited mainly by the SATA III interface. Write speeds could be better, but this is a limitation of the SSD, not the NUC. Notice that write performance dips for sustained writes on the Samsung 840. This is normal for this drive.
Western Digital Blue 1TB SSD

Western Digital Blue 1TB SSD performs better than the older Samsung SSD with the 100x100M write test.
After swapping the Samsung 250G SSD with the WD Blue 1TB SSD, I ran the tests again to see how the WD Blue performs. Results are good. Then, I switched back to the Samsung 250G SSD.
From the tests and from everyday usage, the NUC allows full-speed operation of NVMe and SSD storage. Higher-end components would most likely yield faster results.
Power Consumption
Using a Kill-A-Watt power meter, I monitored the wattage of the NUC when performing different tasks to see how efficient the NUC could be.
 Watts  Task (NUC8i3BEH)
-----------------------------------------------------------------
    1W  Off
   28W  CrystalDiskMark 6.0.2 (Windows 10 ~25-26W typical)
   10W  Idle Windows 10 desktop
    6W  Idle Xubuntu 19.10 desktop
 7-12W  Updating apt (Xubuntu 19.10)
   21W  Installing software (sudo apt install net-tools)
13-16W  Disks benchmark (Xubuntu 19.10)
    8W  Firefox browsing. Normal usage.
Fan Noise
Is there a fan?
Yes. The NUC contains an internal fan beneath the main board. Most of the time, it is silent, and it cannot be heard at all. When usage reaches 12-18W or higher or when CPU usage is 100%, then the fan ramps up. Yes, the fan can be heard from over 1 meter away.
The NUC is quiet, but not 100% silent. If using this as a daily machine, then I would mount it under a desk as far away from the keyboard as possible to minimize audible fan noise, because the fan is audible. Nothing loud or grating, but it can be heard when maxing out the system.
When system usage returns to idle, the fan quiets down too. Other times, the fan will ramp up when apparently nothing is happening with the system.
Conclusion
Wow! This is neat!
I have enjoyed experimenting with this NUC using Xubuntu 19.10. The two were made for each other. Fast, snappy performance with fast storage. Quiet, low-power operation. Hassle-free Linux compatibility without driver installation. Simple to install and use. Best of all: Linux works out of the box!
This concludes the base operating system installation. Since this little NUC will seen mostly network-based action, the next step is to set up link aggregation and bond two Ethernet ports together for faster data transfers.
The fun continues!
