⌚ July 29, 2013
 You would think that the joy of using the Cyborg/Mad Catz R.A.T.7 with Ubuntu and Linux Mint would be enough to bring smiles and prolonged happiness, but no! A great mouse was made even better in the form of the glowing, programmable Mad Catz M.M.O.7 Mouse
With more buttons than any regular user could possibly need, the M.M.O.7 is without doubt the best mouse I have ever used. But the question is, “Will the M.M.O.7 work with Ubuntu, or better yet, Linux Mint 15?”
The answer is yes, it works great, but there are some issues to be resolved. This informal review shares my experience using this slick mouse with Linux Mint 15.
Even though I am using Linux Mint 15, I have tested this mouse in Ubuntu, and the issues were identical, so what applies to Linux Mint also applies to Ubuntu.
Update: Added instructions about how to resolve the CTRL+F keyboard shortcut that occurs after xbindkeys is installed.
About the M.M.O.7
Before we launch into the details of making this glowing wonder work with Linux Mint 15 (or Ubuntu), let’s take some time to savor its visual delights.
Packaging
Unlike cereal boxes where the picture of the product often differs from the contents, the Mad Catz M.M.O.7 ships in a small cardboard box with an accurate representation of the hardware, so you know what you are getting before the purchase.

Mad Catz M.M.O.7 Gaming Mouse neatly tucked in its packaging.
Inside, the mouse is neatly packed in tough, black foam for protection. There is little danger of the mouse becoming damaged during transit.
Style Colors
Four color models exist as of the time of this writing, and this is the black/orange model. An attractive feature is that the metal base plate on the underside of the M.M.O.7 matches the secondary orange color of the mouse. Nice touch.

The solid metal, orange base adds to the build quality and improves the appearance.
There is a protection sticker on the bottom that must be removed before use.
Package Extras
Like the Cyborg R.A.T.7, the M.M.O.7 is fully customizable. You can swap parts, adjust the palm rest, change right-side gripper from matte to rubber, change the weights, and adjust the thumb rest angle. Spare parts are included, but they are packaged in the foam beneath the mouse. There is not a dedicated metal/plastic container for holding the parts like there was with the Cyborg R.A.T.7 (metal storage box) and Albino (white plastic box).

The Cyborg R.A.T.7 and Albino both shipped with a separate container for holding the replaceable mouse parts, but there is no such container for the M.M.O.7. All parts are stored in the foam inside the box.
- The entire mouse has a soft, matte feel reminiscent in higher-quality electronics. Just touching this is a joy.
- A small instruction manual is included.
- There is no software included. If you wish to program this mouse for Windows, then you must visit the Mad Catz web site and download the software.
- The nylon cable is flexible and sports a black/orange style to match the mouse. Another nice touch.
- The entire mouse feels solid in the hand and feels like a well-built, sturdy, quality product. Given its price, you are definitely receiving what you pay for.
Compatibility
The box proclaims PC and Mac compatibility, but rest assured, the M.M.O.7 works with Linux as well. I have tested it with Ubuntu 10.10, Ubuntu 12.04, Ubuntu 13.04, and Linux Mint 15 on a variety of systems. The M.M.O.7 performed the same on all of them. Just plug and play. Linux recognizes the mouse without the need to install any drivers.
However, the buttons would become unresponsive until restarting X, but this issue is remedied.
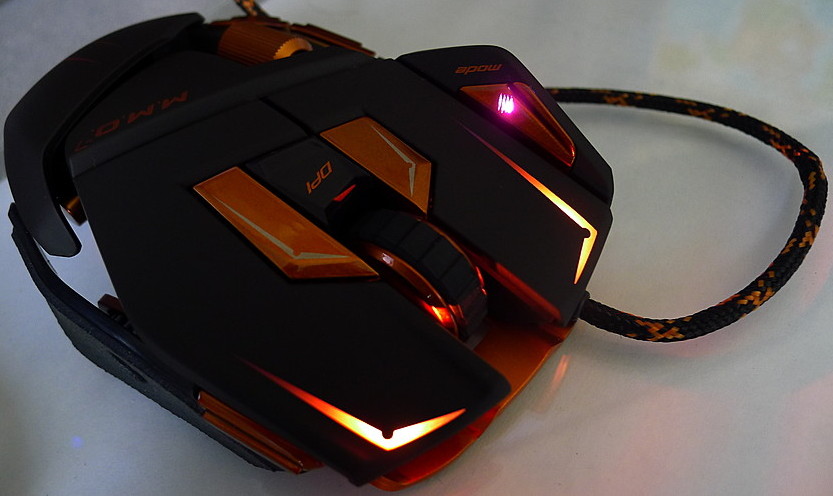
LED Colors
Upon plugging this mouse into a spare USB port, you will be greeted with a variety of colorful glows from built-in lights. The lights remain steady. They do not blink or pulsate.
The Mad Cartz M.M.O.7 Mouse plugged in and ready for use.
A four-level red bar graph on the side shows the tracking sensitivity setting, a mode button changes color depending upon the programming mode, but the most striking change is that the left and right mouse buttons have their own color LEDs that can be adjusted individually through software to any of hundreds of colors. However, the Windows software (running on a Windows computer) must be used to change the colors.

The LED colors for the left and right mouse buttons are programmable using the Windows software. However, the M.M.O.7 stores the color settings so even if power is lost, the programmed colors return. Here, we see the left mouse button set to blue while the right mouse button is set to yellow-orange.
Extra Buttons
The other noticeable improvement over the R.A.T.7 involves the extra side buttons. There are ten–yes ten–side button you can press with your thumb. Gone is the lone red button on the R.A.T.7. Now, there are three new buttons labeled 1, 2, and 3 in addition to the two side buttons (buttons 8 and 9) and a small directional nub that offers up, down, left, right, and in movements. The nub feels like a small thumbstick.

Side view showing the extra buttons. The buttons are programmable in Windows using the custom software, but they are also programmable in Linux using xbindkeys and xdotool.
Despite all of the extra buttons, each has its own “feel,” so there is little need to look at the mouse to find out which button to press…after you become used to the mouse, of course.
There are also two extra orange buttons on the left and right buttons that act as locks. If you ever find the need to hold down a mouse button for an extended period of time, simply press the lock button (the button changes color to acknowledge your intentions) and then press the mouse button itself. The mouse will simulate holding down the button for you until clicked again.

The two, smaller orange buttons on either side of the mouse wheel provide a button-locking feature that simulates holding down the corresponding mouse button. When pressed, the button color changes to show that it is active and the button is “held down” for you. The button does not physically depress. The locking button colors can also be adjusted using software.
One change from the R.A.T.7 involves the sensitivity button. This is the small button located below the mouse wheel and labeled “DPI.” Whereas on the R.A.T.7 you could press it up and down to adjust the sensitivity higher and lower, this is a single button. Pressing it repeatedly increments the sensitivity (noted by a four-level LED meter on the side) until it wraps around to the lowest setting again.
Sensitivity is superb. In fact, it can be too sensitive at times when set to higher levels, and I find that the lowest setting is more than adequate.
Making the M.M.O.7 Work with Linux Mint 15
The Cyborg R.A.T. 7 and R.A.T.7 Albino both suffered from the problem of unresponsive mouse buttons after a period of time. The M.M.O.7 also has this problem despite having the Mad Catz name instead of the Cyborg name.
What happens to spoil the fun? Upon booting the computer, the mouse will appear to work fine, but after a few minutes, the buttons will become unresponsive. Moving the M.M.O.7 still moves the cursor, but the mouse buttons have no effect.
The way around this is to restart X using CTRL+ALT+Backspace (or LeftAlt+PrtScrn+k depending upon your configuration). The mouse then works properly and all buttons become responsive again until the next reboot, upon which X must be restarted again.
The way around this is to modify /etc/X11/xorg.conf with the following lines:
Section "InputClass"
 Identifier "Mouse Remap"
 MatchProduct "Mad Catz Mad Catz M.M.O.7 Mouse|M.M.O.7"
 MatchIsPointer "true"
 MatchDevicePath "/dev/input/event*"
 Option "Buttons" "19"
 Option "ButtonMapping" "1 2 3 4 5 0 0 8 9 10 11 12 0 0 0 16 17 7 6"
 Option "AutoReleaseButtons" "13 14 15"
 Option "ZAxisMapping" "4 5 6 7"
EndSection
If xorg.conf does not exist, create it using touch /etc/X11/xorg.conf
Update: While the above listing works fine for earlier distribution versions, I have encountered issues with recent distributions (Xubuntu 14.04 and Linux Mint 17) running 3.14.10 or later. The revised listing below seems to work better:
Section "InputClass"
    Identifier "Mouse Remap"
    MatchProduct "Mad Catz Mad Catz M.M.O.7 Mouse|M.M.O.7"
    MatchIsPointer "true"
    MatchDevicePath "/dev/input/event*"
    Option    "Buttons" "24"
    Option    "ButtonMapping" "1 2 3 4 5 0 0 8 9 10 11 12 0 0 0 16 17 7 6 0 0 0 0 0"
    Option    "AutoReleaseButtons" "20 21 22 23 24"
    Option    "ZAxisMapping" "4 5 6 7"
EndSection
This is almost the same as the R.A.T.7 except for the button mappings and the Match Product. There are a few things to mention about this.
The MatchProduct line is what identifies the M.M.O.7. It might look like a misprint by duplicating “Mad Catz Mad Catz,” but this is indeed correct. Running dmesg with the M.M.O.7 connected shows that the product string is “Mad Catz Mad Catz M.M.O.7 Mouse.” Therefore, we need to use this exact string to identify the mouse to the system in xorg.conf. Remember, this information must be obtained from something like dmesg, not lsusb.
In the dmesg output using a terminal, we are looking for the line that reads “input: Mad Catz Mad Catz M.M.O.7 Mouse as /devices/…” (abbreviated for brevity). The string between “input:” and “as” is what we need to use for MatchProduct.
Another method is to use xinput.
xinput list
This lists the same string along with the M.M.O.7’s ID when connected to the USB subsystem.
In the example above, there is an OR construct using the pipe so that if the exact Mad Catz Mad Catz M.M.O.7 Mouse part is missing or altered by a different product, we can at least match up the M.M.O.7 part. I have never had any issues, so this is probably redundant.
Another caveat involves the button mapping. I have found that this exact section works most of the time, but in some computers, it needs to be modified to 24 buttons and we need to adjust the ButtonMapping part. No idea why. It could be a corrupt xorg.conf or something else might not be working properly. In any case, the above section has given me the best results, and when the M.M.O.7 does not behave properly, I modify it for the specific system. Your results might vary as well, so experiment. It might be a little work, but this mouse does indeed work flawlessly with Linux Mint 15 when a matching configuration exists in xorg.conf. No need to restart X upon each reboot.
UPDATE: MatchProduct is important. If the M.M.O.7 still results in unresponsive buttons, it is probably because of an incorrect this line. I have found that the same string will not work for every system. For example, the product string Mad Catz Mad Catz M.M.O.7 Mouse works fine on one system but not another in Linux Mint 17. The solution in Linux Mint 17 on the non-detecting system was to change the product string to Mad Catz M.M.O.7 Mouse. The M.M.O.7 mouse worked fine following a reboot.
The best way to find out in Linux Mint 17 is to analyze the syslog files located in /var/log and look for the lines that initialize the M.M.O.7. Usually, this is syslog.1.log. The correct product string will be given there, so use that in xorg.conf. All other lines in xorg.conf may remain unchanged.
“Look at all of the pretty lights!”
The M.M.O.7 is programmable. This means you can program any of the extra buttons to correspond to keypresses on the keyboard. For example, you can program button 1 on the M.M.O.7 to press the TAB key on the keyboard. It works as it should…in Windows, not in Linux.
The programming feature requires downloading Windows software from the Mad Catz web site. A convenient feature of the programming aspect is that you can customize the colors of the left and right mouse buttons. The effect is attractive, but this can only be accomplished in Windows running the M.M.O.7 software, which does not work in Linux.
So, for now, to change the mouse colors, use Windows if you have a system available. The mouse remembers the color settings when disconnected and moved to different systems, so if you set the colors using Windows on one computer, you can plug the M.M.O.7 into another computer running Linux Mint 15, and the M.M.O.7 with illuminate with the colorful radiance you programmed on the Windows computer. However, the programmable mouse buttons are system-specific and not remembered by the mouse, so this is a different matter.
Programming the M.M.O.7 Buttons in Linux
All of those extra buttons beg attention. Is there any way to use them in Linux?
Yes! However, the solution requires a bit of command line know-how and the installation of a few programs. We can map extra mouse buttons to keyboard presses and combinations without using the Mad Catz software. Linux has xbindkeys and xdotool that map buttons from any mouse to keyboard keys and combinations. Let’s install three programs.
sudo apt-get install xbindkeys xvkbd xdotool
These are interesting programs that can be used in a variety of scenarios, not exclusively with the M.M.O.7. We will be returning to these programs in a moment.
Getting Mouse Buttons with xinput
Before we can program the mouse buttons, we need to know each button’s number. Each mouse button is identified by a number, but how do we know which button is which number? One way is to use xinput. First, get the id of the M.M.O.7 by running xinput list.
xinput list
This should produce output similar to the following:
⎡ Virtual core pointer id=2 [master pointer (3)]
⎜ ↳ Virtual core XTEST pointer id=4 [slave pointer (2)]
⎜ ↳ Saitek Cyborg R.A.T.7 Albino id=8 [slave pointer (2)]
⎜ ↳ Mad Catz Mad Catz M.M.O.7 Mouse id=11 [slave pointer (2)]
Look for the line containing the M.M.O.7 and note its id to the right of the string. In this case, the M.M.O.7 is id=11. We need this id number for the next step.
Now, run xinput in test mode using this id.
xinput --test 11
The terminal waits for you to press mouse buttons and move the mouse around. Each button press generates text reading something like “button press 10” and “button release 10.” The number you see in the output is the number of the button. xinput will only listen for the device specified by the id, so if you have two mice connected, only the one with device id=11 will respond in the terminal. The other mouse can be used to control your system normally during the test.
However, you will notice that some buttons do not register with xinput as-is. We need to specify a button map for xinput, and this is where trial and error plays a role.
Notice in the ButtonMapping line from the xorg.conf section above that there is a list of numbers “1 2 3 4 5 0 0 8 9 10 11 12 0 0 0 16 17 7 6.” This is a button map that maps mouse buttons to specific functions. Place is important. We need to do something similar with xinput using the set-button-map option. After the mouse id, enter a sequence of numbers from 1 to 24. This allows xinput to display the button numbers for all button presses.
xinput set-button-map 11 1 2 3 4 5 6 7 8 9 10 11 12 13 14 15 16 17 18 19 20 21 22 23 24
Now, pressing any button on the M.M.O.7 will show that button’s number. However, you do not want to use this sequence in the ButtonMapping line. Problems will arise. Some buttons must be canceled using 0, and others ignored. Buttons 20 to 24 must be canceled. Buttons 6 and 7 must be canceled from their natural order in the sequence and moved after 16 and 17. This is why the ButtonMapping line has a strange ordering of numbers instead of a straight sequence.
There is not a lot of documentation available about this subject that explains mouse button mapping in a helpful manner, so be prepared for much trial and error if you wish to have every button working properly without the need to restart X. Even though xinput identifies the buttons properly given a straight sequence, xorg.conf might throw fits and produce unresponsive mouse buttons again. Overall, the ButtonMapping sequence shown earlier seems to work the best for my system even if some buttons are excluded.
I would recommend writing out the buttons and their numbers so you can create a reference to look up later for convenience.
Using the Buttons
Okay, we know the button numbers. How do we use them? Recall that we installed xbindkeys, xvkbd, and xdotool? We need these programs to map buttons to keyboard keypresses so when we press a custom button on the M.M.O.7, the corresponding key on the keyboard will activate through software. For example, pressing Button 10 presses the “e” key on the keyboard. Actually, this is what the Mad Catz software in Windows does.
The two programs that accomplish this are xbindkeys and xdotool. xbindkeys grabs button events, and xdotool simulates keyboard activity. (More possibilities exist with these programs, but these are our purposes for this example.)
xbindkeys –defaults > ~/.xbindkeysrc
gedit ~./xbindkeysrc
This creates an initial, hidden configuration file (called .xbindkeysrc) for xbindkeys and places it in the home directory. When xbindkeys runs, it checks this config file and loads any settings to handle the mouse buttons.
Let’s suppose we want to map the two side buttons (buttons 8 and 9) to ctrl+alt+Right and ctrl+alt+Left to handle workspace switching in the Cinnamon desktop environment. Keep in mind that these keyboard shortcuts must already exist for this to work. If not, then create them yourself in System Settings > Keyboard > Keyboard Shortcuts.
Open ~/.xbindkeysrc in gedit or any other text editor, and add the following two lines anywhere.
"xdotool key --clearmodifiers ctrl+alt+Right"
    b:8
"xdotool key --clearmodifiers ctrl+alt+Left"
    b:9
Save the changes. You can test it by running xbindkeys in a terminal and pressing the extra mouse buttons 8 and 9 to see if they do what they should.
But what did we just do with these new lines? “xdotool key –clearmodifiers ctrl+alt+Right” (Be sure to surround the line with straight double quotes) and b:8 says “When button 8 is pressed on the mouse, press ctrl+alt+Right on the keyboard.” The result should switch the workspace to the right–the same as pressing CTRL + ALT + RightArrow on the keyboard. clearmodifiers is an option that avoids any modifier key residue, such as the shift key being held down from a previous key press.
xdotool is a powerful program with plenty of options and customization, so experiment. But be prepared for much trial and error. I have found some mouse buttons do not play well with other combinations, and I had to reconfigure keyboard shortcuts and create new shortcuts. Your imagination is the limit. It might not be as easy to configure as the Mad Catz Windows software, but it does the job.
(Another binding program is called btnx. It includes a GUI and appears easier to use, but I could not find it in the repository. If you can use it, give it a try.)
Keep in mind that it might be impossible or tricky to make every single custom mouse button map to keyboard shortcuts. It largely requires trial and error. Some key combinations take effect while others will not. While experimenting, I found that once a set of custom buttons were functioning properly, such as the side buttons used for switching workspaces, mapping more keyboard shortcuts to other custom buttons had no effect. Removing and swapping shortcuts in .xbindkeys would make the new shortcuts function, but the workspace would no longer switch. It is all about finding the best combination of shortcuts. In the end, I chose the most important keyboard shortcuts, ensured that they functioned properly, and then ignored mapping the other mouse buttons.
Automatically Starting xbindkeys
The custom mouse buttons will only work if xbindkeys is running. To make it automatic upon startup, add a new startup program that runs xbindkeys. System Settings > Startup Programs. The extra mouse buttons should run upon each boot according to the settings found in ~/.xbindkeysrc.
As an added benefit, each user may have his own .xbindkeysrc configuration file for customized settings.
What is xvkbd?
This is a virtual on-screen keyboard that I find useful for debugging, which is why I installed it anyway.
CTRL+F Not Working
By default, xbindkeys overrides the CTRL+F key combination. For example, entering CTRL+F in Firefox or a text editor to perform a search results in nothing happening. The solution is to remove the offending entry (or comment it out) from .xbindkeysrc, which looks like this:
# set directly keycode (here control + f with my keyboard)
"xterm"
 c:41 + m:0x4
Save and restart xbindkeys. Another way to delete it is to use xbindkeys-config.
1. Install xbindkeys-config. This is a GUI used to edit .xbindkeys.
sudo apt-get install xbindkeys-config
2. Open xbindkeys-config, and delete the entry containing the “here control + f” text in the Name column.

xbindkeys-config showing the entry that intercepts the CTRL+F key shortcut.
Highlight the line, and click Delete Selected. Click Save & Apply & Exit. CTRL+F should work properly.
Conclusion
The Cyborg R.A.T.7 is in excellent mouse, and the M.M.O.7 takes it to another level of customization. It is compatible with Linux, attractive to look at, feels sturdy with its metal components, and illuminates well in the dark.
Of course, there are some negatives. The programmable software only works with Windows, so to achieve similar programming results with the buttons, you must use programs such as xbindkeys and xdotool. The lights are not programmable from Linux, and the M.M.O.7 still has the unresponsive button problem that plagued the Cyborg R.A.T.7. While the buttons can be resolved by modifying xorg.conf, changing the lights cannot.
Despite the issues, this is still an excellent mouse featuring high precision and sporting a “techie” appearance for serious users. Again, this is definitely the best mouse I have ever used, and I have been exceedingly pleased with my purchase. It is practically the same as the R.A.T.7 only with added lighting and programmable buttons, but if you enjoy further button customization, then the M.M.O.7 will work magic the R.A.T.7 cannot.
This mouse continues to perform as well as it did without any form of dead laser issues, and I would highly recommend it to anyone seeking a quality mouse for Linux.
